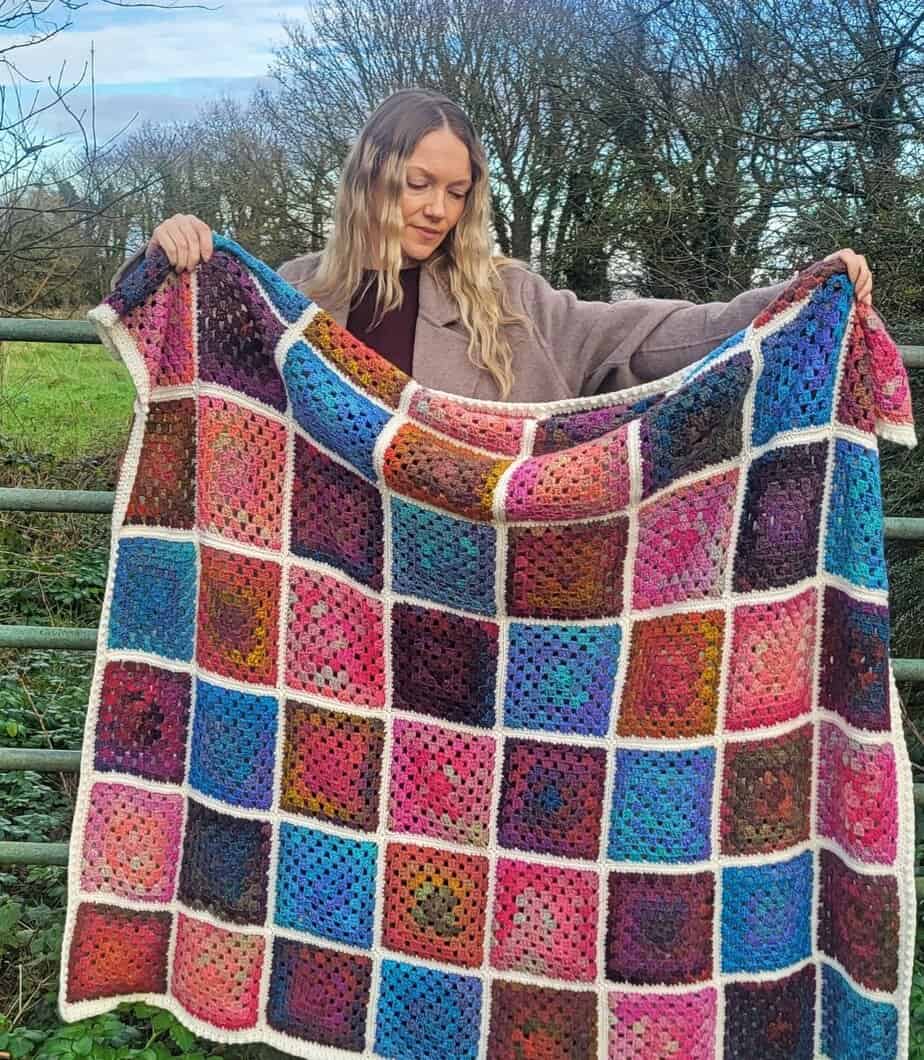
This granny square blanket with variegated yarn is an easy and relaxing crochet project. The free crochet pattern uses simple granny squares that are perfect for crocheting on the go.
Using a variegated yarn means every square looks slightly different without changing colours each round. It’s an easy blanket to work on, a few squares at a time until the full blanket comes together.
Granny squares are one of the most portable crochet projects you can make. I worked on the squares for this blanket last summer and they quickly became my favourite project to take anywhere. I crocheted a few squares here and there during the day, and many more while sitting outside in the evening.
When the evenings started getting darker, I remember sitting at my kitchen table joining all the squares together. It’s always satisfying to see a pile of crochet granny squares slowly turn into a cosy blanket!
Why Use Variegated Yarn for Granny Squares
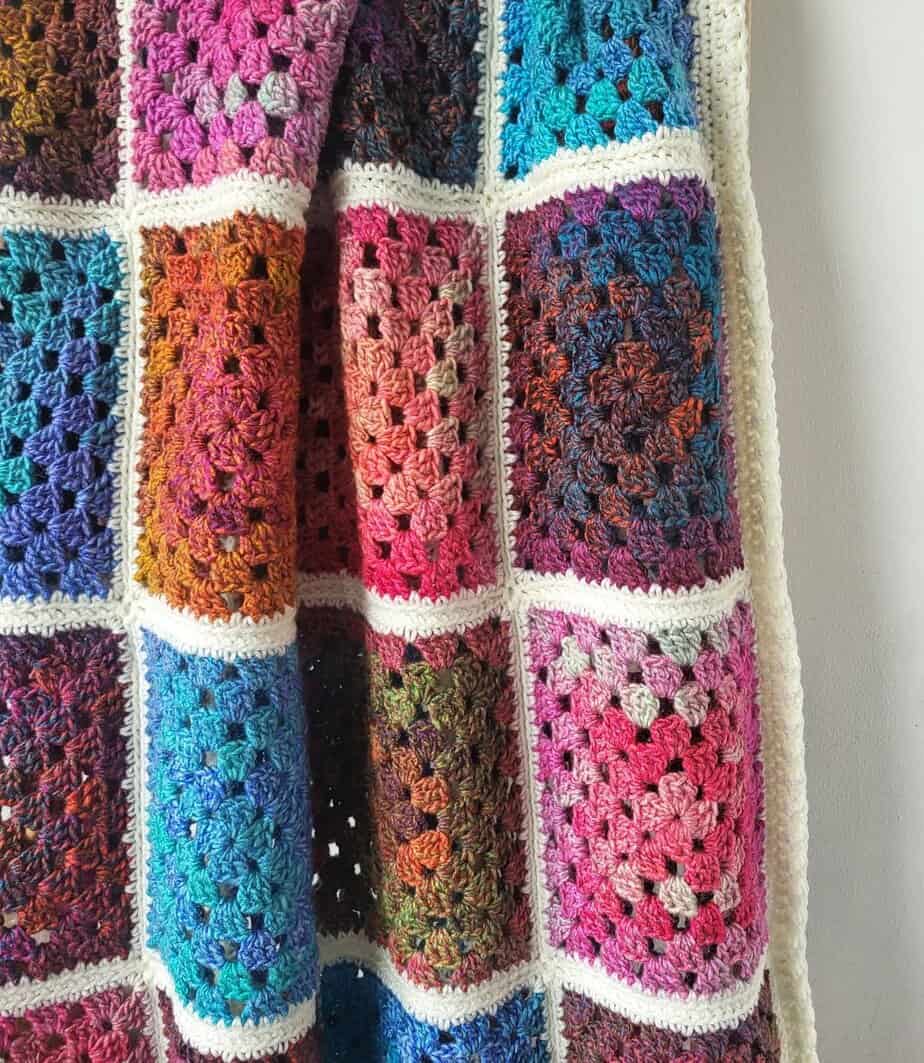
Using a variegated yarn for a granny square blanket creates lovely colour changes without needing to switch yarn every round. The colours shift naturally from stitch to stitch, giving each square its own unique look.
For this blanket I used Sirdar Jewelspun Aran, which works beautifully for granny squares. The colour changes flow naturally through each square and create a colourful blanket once everything is joined together.
Another benefit of using variegated yarn is fewer ends to weave in. Each square only has two ends, making the finishing much quicker.
About this Granny Square Blanket
This easy granny square crochet blanket is made from simple, relaxing squares that are easy to pick up and put down. Once all the squares are finished, they are joined together and framed with a soft cream border that brings all the colours together.
For my blanket I chose four Jewelspun shades and crocheted 14 squares from each ball, giving a total of 56 granny squares.
Jewelspun is slightly thinner than a typical worsted weight yarn. After trying a few options for joining the squares, I found that Stylecraft Special DK worked very well and created neat seams while still blending nicely with the blanket.
Each square measures approximately 7 x 7 in (18 x 18 cm) and the finished blanket measures about 51 x 58 in (129.5 x 147 cm) including the border.
The squares are joined in continuous rows, working across one row at a time before joining the rows together to complete the blanket.
Yarn Suggestions for the Variegated Granny Square Blanket
I used the following amount of yarn and hooks for my blanket:
- 2184 yards lighter worsted weight acrylic yarn (yarn used in the sample works up more like a heavier DK weight)
- 546 yards each of 4 different colors
- 644 yards of DK weight acrylic yarn for joining and border
- 4.5 mm and 5 mm hooks
For the blanket pictured here, I used Sirdar Jewelspun Aran, a variegated yarn that creates beautiful colour changes in each square. Four colours were used, with 14 squares crocheted from each ball. The squares are joined using Stylecraft Special DK in cream, which worked well with the slightly lighter weight of Jewelspun.
You can use any variegated yarn, solid colours, or even scrap yarn to make your own version of this granny square blanket.

More Granny Square Blanket Patterns
If you love making granny square blankets, you might also enjoy these other patterns on the blog:
Pattern for the Granny Square Blanket with Variegated Yarn
A gorgeous crochet blanket made up of simple, relaxing granny squares that are perfect for portable crochet. Each square can be made at your own pace, then joined together and finished with a soft cream border that neatly frames the colours.
Materials
- Sirdar Jewelspun Aran – 100% acrylic/546yds/500m/200g
- 1 ball each: Glowing Garnet (0848), Midnight Fyords (0847), Setting Sun (0843), Turquoise Sky (0854)
- Stylecraft Special DK (CC) – 100% acrylic/322yds/295m/100g
- 2 balls of cream
- 4.5mm & 5mm crochet hook
- Yarn needle
You can use any aran/worsted weight yarn for this pattern but your yardage and hook size may vary.
Notes
- The pattern is written in US crochet terms.
- Gauge is not important for this project.
- Blocking each square is recommended.
- Each square is worked in rounds and a border is worked around the edges of the main blanket.
- Ch3 at beginning of a round counts as 1 dc.
- Ch1 at beginning of a round does not count as a st.
Abbreviations
US Crochet Terms
- Sl st – slip stitch
- Sc – single crochet
- Hdc – half double crochet
- Dc – double crochet
- Tr – treble crochet
- Ch – chain
- St – stitch
- Sp – space
- Beg – beginning
- Rep – repeat
- CC – contrast color
- RS – right side
Measurements
Each square measures 7 x 7 in [18 x 18 cm]
Finished Blanket has 56 squares with a border and is approx. 51 x 58 in [129.5 x 147 cm]
Color Notes
You will make a total of 56 squares. Make 14 squares from each ball of Sirdar Jewelspun yarn.
Printable PDF: Ad-free PDF pattern including all details of pattern. Thank you for your support! Purchase on Ravelry and on Etsy
Granny Square (make 56)
(Do not turn your square after each round)
Using a 5mm hook, ch 5 and sl st to 1st ch to form a ring
Round 1 (RS): Ch 3 (counts as 1 dc here and throughout at beg of a round), 2 dc in ring, [ch 2, 3 dc in ring] 3 times, ch 2, join with a sl st in 3rd ch of beg ch 3. Sl st into the next 2 dc and the next ch-2 sp ready to start Round 2.
Round 2: Ch 3, (2 dc, ch 2, 3 dc) in same ch-sp, [ch 1, (3 dc, ch 2, 3 dc) in next ch-2 sp] 3 times, ch 1, join with a sl st in 3rd ch of beg ch 3. Sl st into the next 2 dc and the next ch-2 sp.
Round 3: Ch 3, (2 dc, ch 2, 3 dc) in same ch-sp, ch 1, 3 dc in next ch-1 sp, ch 1 in next ch-1 sp, * (3 dc, ch 2, 3 dc) in next ch-2 sp, ch 1, 3 dc in next ch-1 sp, ch 1 in next ch-1 sp; rep from * twice, join with a sl st in 3rd ch of beg ch 3. Sl st into the next 2 dc and the next ch-2 sp.
Round 4: Ch 3, (2 dc, ch 2, 3 dc) in same ch-sp, ch 1, [3 dc in next ch-1 sp, ch 1] to next corner ch-2 sp, * (3 dc, ch 2, 3 dc) in next ch-2 sp, ch 1, [3 dc in next ch-1 sp, ch 1] to next corner ch-2 sp; rep from * twice, join with a sl st in 3rd ch of beg ch 3. Sl st into the next 2 dc and the next ch-2 sp.
Round 5: Ch 3, (2 dc, ch 2, 3 dc) in same ch-sp, ch 1, [3 dc in next ch-1 sp, ch 1] to next corner ch-2 sp, * (3 dc, ch 2, 3 dc) in next ch-2 sp, ch 1, [3 dc in next ch-1 sp, ch 1] to next corner ch-2 sp; rep from * twice, join with a sl st in 3rd ch of beg ch 3. Sl st into the next 2 dc and the next ch-2 sp.
Round 6: Ch 3, (2 dc, ch 2, 3 dc) in same ch-sp, ch 1, [3 dc in next ch-1 sp, ch 1] to next corner ch-2 sp, * (3 dc, ch 2, 3 dc) in next ch-2 sp, ch 1, [3 dc in next ch-1 sp, ch 1] to next corner ch-2 sp; rep from * twice, join with a sl st in 3rd ch of beg ch 3. Sl st into the next 2 dc and the next ch-2 sp. Fasten off yarn.
Round 7: Using CC yarn, join in any st. Ch 1, 1 sc in same st. Work 1 sc in each st and ch-1 sp around square, working 3 sc in each corner ch-2 sp. Fasten off yarn and weave in all threads.
Notes for Joining Blanket Squares
- You can use a yarn needle to sew squares together if preferred.
- Joining instructions are given for blanket pictured.
- Lay out squares in rows of 7 x 8 squares. Refer to image of the complete blanket as a guideline if you wish.
- It may be helpful to use stitch holders to connect the unworked sides and edges of the squares so the strips of squares will hold together until all seams are completed.
- Seams are worked by holding 2 squares with RS together and inserting the hook through the back loops of both squares and making a sl st join loosely.
Arrange the squares in your preferred layout. The joining of the squares is done in continuous rows, square by square until an entire row is finished. You will only cut your yarn when you reach the end of a row.
When you are happy with the layout, begin to join the squares as follows:
- You will join each row to the one below as follows:
- Take the first square from Row 1 and the first square from Row 2. Hold them with RS together, edges aligned.
- Insert hook into the centre sc of the 3-sc corner space on both squares. Ch1, then work 1 sc in the back loop only through both squares in this same centre sc.
- Sl st loosely in the back loop only of each st across both squares, working to the next centre sc of the corner space.
- Take the next pair of squares (one from each row).
- Work 1 sc in the centre sc in the back loop only of the corner space through both squares.
- Sl st loosely in the back loop only of each st across both squares to the next corner space.
- Work 1 sc in the centre sc of the corner space through both squares.
- Repeat as above across the row, joining each pair of squares.
- Finish by working 1 sc in the back loop only in the final centre sc of the last corner space through both squares. Fasten off yarn.
Vertical Join
Turn partially joined blanket and work the un-joined squares in the same way as the horizontal seams, crocheting over the tops of the horizontal seams. (Tip – make a ch-1 over the seams) Fasten off and weave in ends.
Border
Note: To evenly fit the border stitches, make about 25 stitches across each square.
You will make 1 sc in each place where the squares join (or a sctog over 2 stitches, catching 1 st on each side of the join) and (1 sc, ch 1, 1 sc) for the corners in each middle sc of the 3 sc corner stitches.
Work border rounds with RS facing throughout. Use a smaller hook if needed (I used a 4.5mm hook)
Round 1: Join CC in center sc of the 3 sc corner stitches, ch 1 (does not count as a st), (1 sc, ch 1, 1 sc) in same st (1st corner made), * sc evenly across making 25 sc along each square, and 1 sc between each square (see note above) until you reach next corner, (1 sc, ch 1, 1 sc) in center sc of corner sp; rep from * around 4 sides. Join with a sl st to beg sc.
Round 2: Ch 1, 1 sc in same st, work 1 sc in each st around, working (1 sc, ch 1, 1 sc) in each corner ch-1 sp. Join with a sl st to beg sc.
Tip: In Round 3, push tr forward before you make the next sc to make it pop out.
Round 3: Ch 2, 1 sc in same st, (1 tr, 1 sc, 1 tr) in ch-1 sp, (corner made),1 sc in next st, * [1 tr in next st, 1 sc in next st] rep from [ ] across, working last sc in st before next ch-1 corner sp, ** (1 tr, 1 sc, 1 tr) in ch-1 sp, 1 sc in next st; rep from * to * twice, and from * to ** once more, leaving out the last sc. Join with a sl st to beg sc, fasten off.
Note: If you find yourself with an extra stitch in Round 3 before any corner, it will be fine if you miss a stitch in order to make the stitch pattern fit.
Finishing
Weave in all threads. You can lightly steam block your blanket if you wish.
More Patterns Using Variegated Yarn
Looking for more inspiration for those skeins of variegated yarn in your stash? Try one of these patterns:
- Vanilla Blush Baby Blanket, a wave stitch blanket which alternates sections of variegated and solid shades
- Lior Scarf, using a variegated lace weight yarn and a fingering weight yarn, held together
- Pink Velvet Scarf, featuring a simple stitch repeat that looks gorgeous in variegated yarn
PIN FOR LATER
Don’t forget to follow me on Instagram and be sure to tag me in your photos so I can see it too, @anniedesigncrochet or #anniedesigncrochet – I can’t wait to see what colours you use with this pattern!
The photographs and pattern contained on this page are the property of Annie Design Crochet.com.
You are welcome to use this pattern to make items to sell, and I would appreciate that you include a link to the free pattern with credit for the designer, thank you!
No unauthorized reproduction, in whole or in part, or distribution of this pattern or content is permitted.
A dream idea! I’m going straight from posting this to my favorite online yarn shop. I love granny squares – quick, easy, fun, and endless variations to explore. Thanks!
Thank you! I really appreciate your comment
Another lovely pattern, thank you so much. Happy birthday to your loved ones.
Aww thank you. We had a great Birthday week!