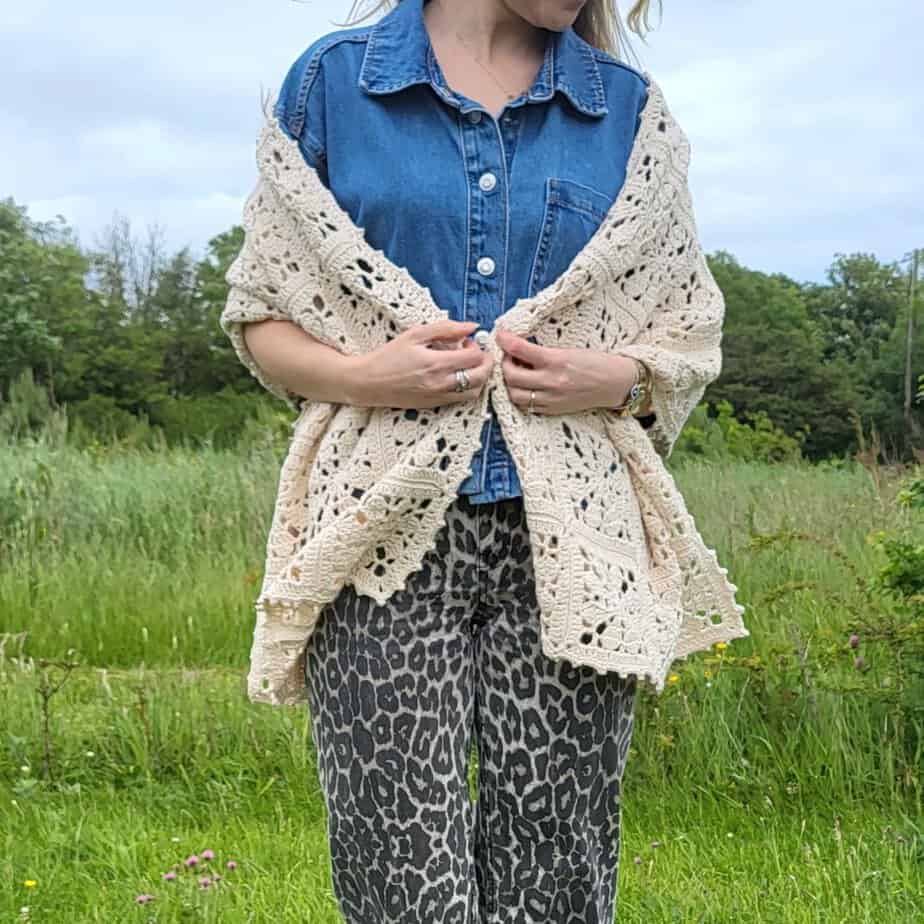
Lace crochet is having a real moment right now, and I’m so happy about it, because this flower crochet shawl pattern might be my favourite make in ages. The square motif is lovely and easy to memorise, so once you’ve made one you’ll fly through the rest. I can already picture it at a summer wedding, thrown over your shoulders at a garden party, or keeping you cosy on a warm evening.
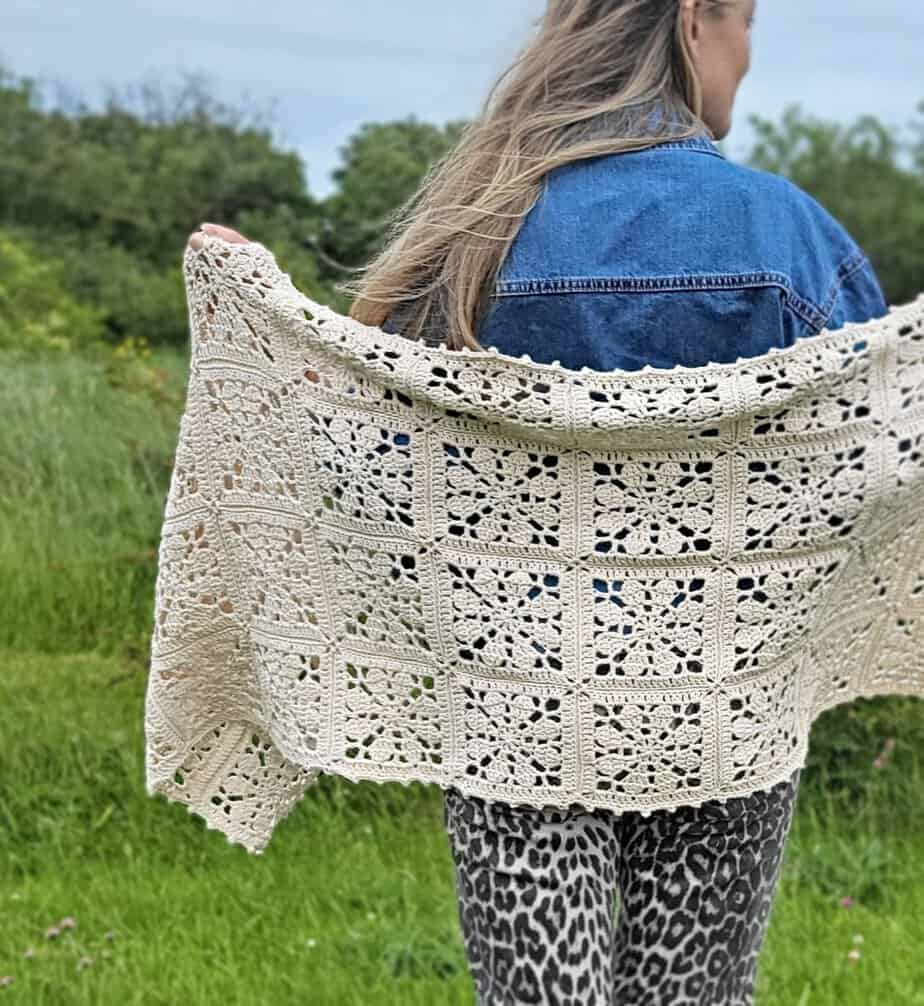
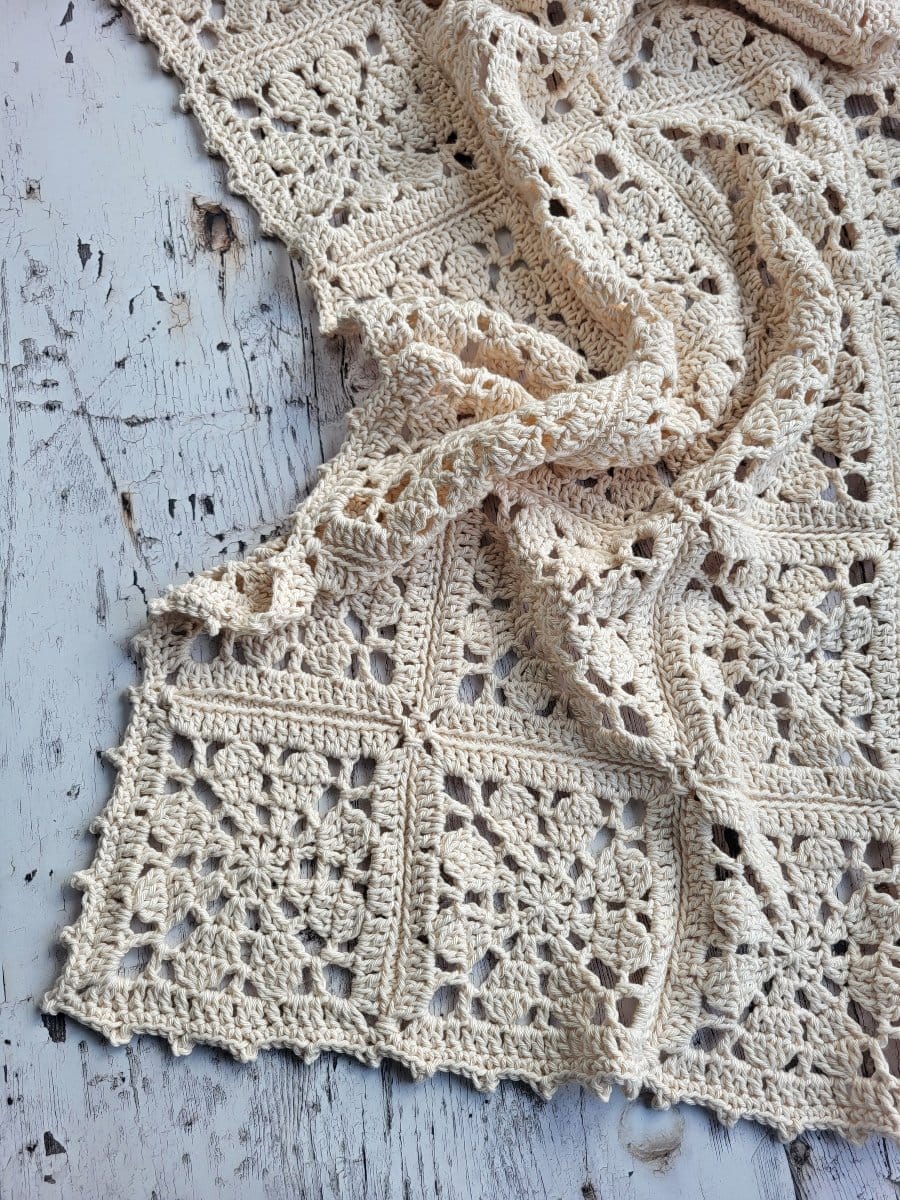
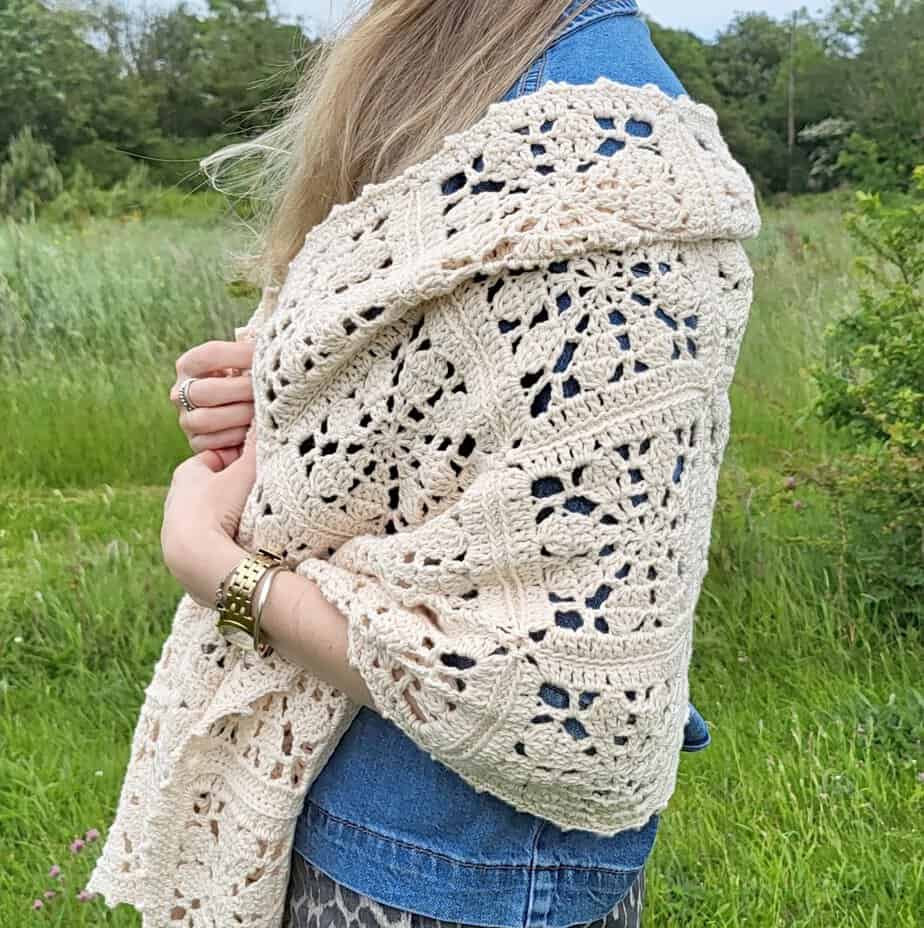
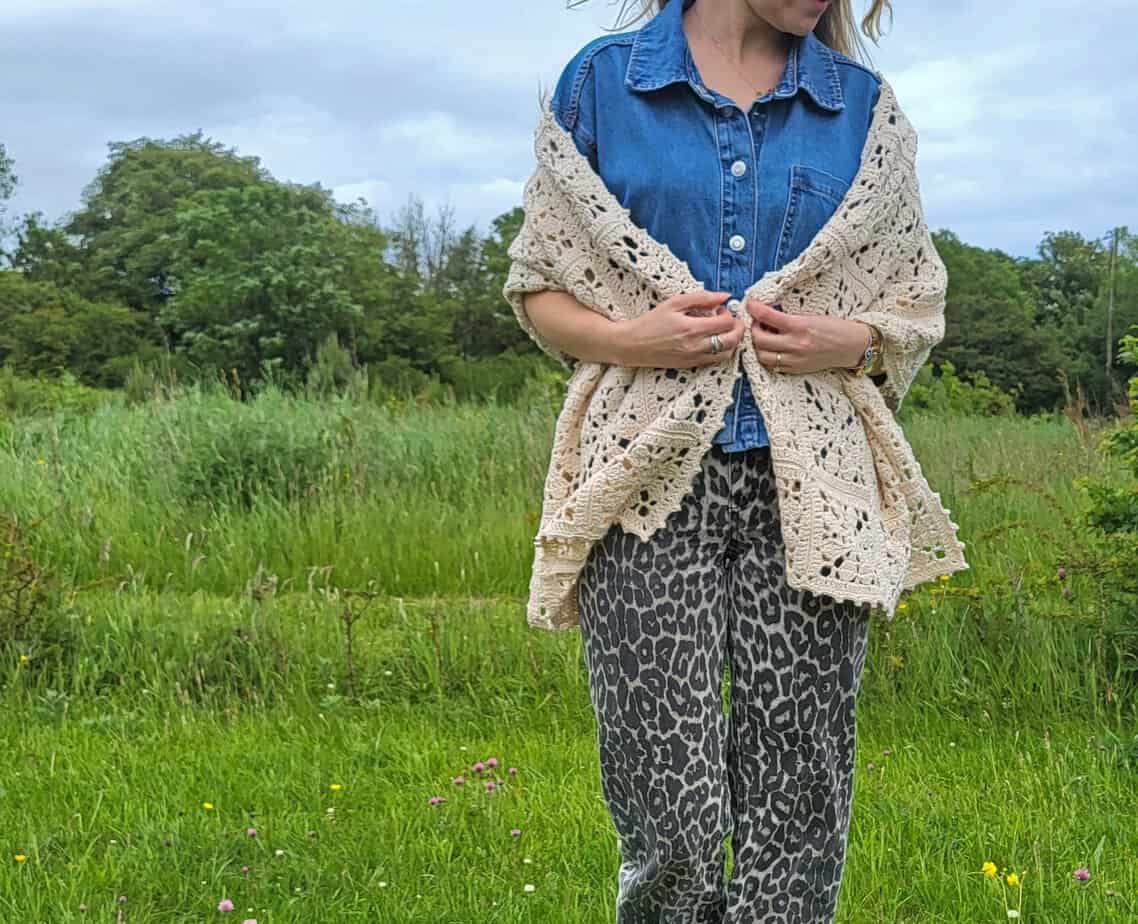
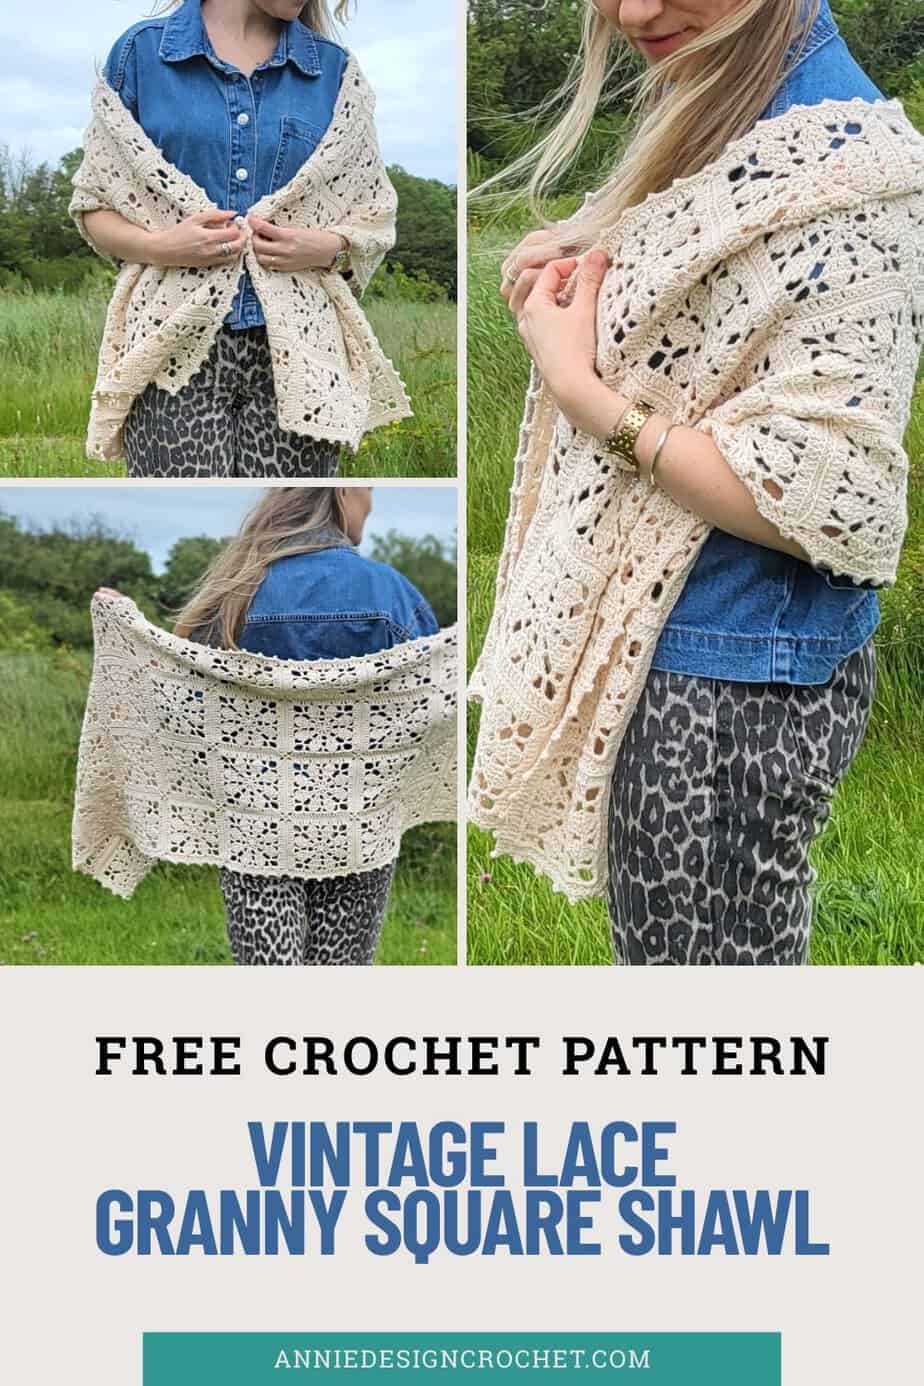
These pretty flower lace squares join together to make the dreamiest summer wrap! Worked in cotton yarn with a delicate picot edging, Florette Shawl is light, airy, and full of that timeless vintage charm.
If you’ve always admired vintage crochet lace but felt intimidated by intricate stitch patterns, this design offers a wonderfully approachable place to start.
The individual motifs are relaxing to crochet and come together to create an elegant shawl you’ll enjoy wearing for years.
Pattern Overview
- Skill Level: Confident beginner
- Yarn: Sports weight — Hobbii Friends Cotton 8/6
- Hook: 3.5 & 4mm
- Finished size: 20.5 x 64 in [52 x 162.5 cm] after blocking
- Stitches used: single crochet, double crochet, double crochet 3 stitches together, double crochet 4 stitches together, picot
Why You’ll Love This Flower Crochet Shawl Pattern
- Worked in easy stitches, so it’s lovely for confident beginners.
- A beautiful, on-trend way to bring vintage lace into your wardrobe.
- The square motif is quick to memorise and so relaxing to make.
- Cotton yarn gives a light, breathable drape that’s perfect for summer.
- An elegant wrap for weddings, garden parties, and warm evenings.
Construction of the Granny Square Flower Shawl
The shawl is made by crocheting individual flower granny squares before joining them together to create the finished wrap. Once you’ve learned the motif, the repetitive construction makes this an enjoyable project to pick up for a few squares at a time, whether you’re crocheting at home or taking it with you on the go.
Because the shawl is made one square at a time, it’s easy to crochet a motif during a lunch break, while traveling, or whenever you have a few quiet minutes. Watching the stack of finished flower squares grow is one of the most satisfying parts of the project.
- Free Crochet Pattern: scroll down the blog post for the pattern instructions.
- Printable PDF: Ad-free PDF pattern including all details of pattern and a crochet chart for the square motif. Thank you for your support! Purchase on Ravelry and on
Yarn Suggestions for the Crochet Flower Shawl Pattern
I used the following for my shawl:
- 12 balls of Hobbii Friends Cotton 8/6 in cream (03) — approx. 1380 yds / 1260 m
- 3.5 mm and 4 mm hooks
- Yarn needle
The squares are worked with the 4 mm hook, and the border with the smaller 3.5 mm hook to keep that pretty picot edge nice and neat.
You can use any sportsweight/light DK weight yarn for this pattern, but your yardage and hook size may vary. I used cotton yarn, which gives the shawl a lovely drape and crisp stitch definition, while remaining breathable and comfortable to wear during the warmer months.
After blocking, the lace motifs open beautifully, creating the light, airy fabric that gives this wrap its vintage-inspired look.
More Crochet Lace Shawl and Wrap Patterns
If you love this flower granny square shawl pattern, don’t miss these other beautiful rectangle crochet wraps and shawls:
- Aideen Wrap, a rectangle shawl in filet crochet lace
- Inishfree Shawl, with a delicate wave stitch pattern
- Venetia Wrap, a lacy rectangle wrap with a bobble fringe
- Gemstones Wrap, with a relaxing two-row pattern repeat
Free Pattern for the Florette Crochet Flower Shawl
This vintage-inspired lace shawl is made up of beautiful flower lace squares joined together to create an elegant, airy wrap. Worked in cotton yarn with a pretty picot edging, it’s light, delicate, and utterly timeless – perfect for a summer wedding, a garden party, or simply throwing over your shoulders on a warm evening.
Materials
- 12 balls x cream (03)
- 3.5 & 4mm hook
- Yarn needle
You can use any sportsweight/light DK weight yarn for this pattern but your yardage and hook size may vary. This shawl used approx. 1380yds / 1260m of yarn.
Notes
- The pattern is written in US crochet terms
- Gauge is not important for this project
- The square is worked in rounds
- Ch 3 at beginning of a round counts as 1 dc
- Ch 4 at beginning of a round counts as 1 dc, ch-1
- The stitch count for each round is noted in italics at the end of each round
- The border is worked using a smaller hook. Experiment to see if the hook is the right size for your tension.
- Blocking your squares before joining is not essential, but it will help to even them out and make joining much easier
- A crochet chart is available in the PDF version of this pattern
Abbreviations
US Crochet Terms
- Sc – single crochet
- Dc – double crochet
- Sl st – slip stitch
- St – stitch
- Ch – chain
- Rep – repeat
- Beg – beginning
- Yo – yarn over
Measurements
Shawl pictured measures 20.5in [52cm] in width and 64in [162.5cm] in length after light blocking.
Each square measures 5in x 5in [12.5 x 12.5cm]
Special Stitches
Double crochet 3 together (dc3tog) – (Yo, insert hook in next st, draw up a loop, yo, draw through 2 loops on hook) 3 times, yo, draw through all 4 loops on hook.
Double crochet 4 together (dc4tog) – (Yo, insert hook in next st, draw up a loop, yo, draw through 2 loops on hook) 4 times, yo, draw through all 5 loops on hook.
Picot – Ch 3, sl st back into 1st ch made.
Printable PDF: Ad-free PDF pattern including all details of pattern and a crochet chart for the square motif. Thank you for your support! Purchase on Ravelry and on
Square Pattern (make 48)
Using 4mm hook make a magic ring
Round 1: Ch 4 (counts as 1 dc, ch 1), [1 dc, ch 1] 7 times into ring. Join with a sl st to the 3rd ch of beg ch 4. Pull ring tight – 8dc, 8 ch-1 sp
Round 2: Ch 3 (counts as 1 dc), 1 dc in same st, ch 2, * 2 dc in next dc, ch 2; rep from * around. Join with a sl st to the top of beg ch 3 – 16dc, 8 ch-2 sp
Round 3: Ch 3 (counts as 1 dc), 1 dc in same st, 2 dc in next dc, ch 3, 2 dc in each of the next 2 dc, ch 1, * 2 dc in each of the next 2 dc, ch 3, 2 dc in each of the next 2 dc, ch 1; rep from * 2 more times. Join with a sl st to the top of beg ch 3 – 32dc, 4 ch-3 sp, 4 ch-1 sp
Round 4: Ch 3 (counts as a 1 dc), dc3tog over the next 3 dc, ch 2, [1 dc, ch 5, 1 dc] in next ch-3 sp (corner made), ch 2 * dc4tog over the next 4 dc, ch 2, 1 dc in next ch-1 sp, ch 2, dc4tog over the next 4 dc, ch 2, [1 dc, ch 5, 1 dc] in the next ch-3 sp, ch 2; rep from * 2 more times, dc4tog over the next 4 dc, ch 2, 1 dc in the next ch-1 sp, ch 2, join with a sl st to the top of beg ch 3 – 8 dc4tog, 12 dc, 16 ch-2 sp, 4 ch-5 sp
Round 5: Ch 3 (counts as 1 dc), * 2 dc in next ch-2 sp, 1 dc in next dc, [3 dc, ch 2, 3 dc] in the next ch-5 sp, 1 dc in next dc, 2 dc in next ch-2 sp, 1 dc on next dc4tog, 2 dc in next ch-2 sp, 1 dc in next dc, 2 dc in next ch-2 sp, 1 dc on next dc4tog; rep from * 3 more times, leaving off last dc in the final repeat. Join with a sl st to the top of beg ch 3. Fasten off yarn and weave in all threads – 76 dc, 4 ch-2 sp each side
Finishing
Notes for Joining Squares
- You can use a yarn needle to sew the squares together if preferred.
- Layout your squares in rows of 4 x 12 (total 48)
- It may be helpful to use stitch markers or holders to connect the unworked sides and edges of the squares so the strips hold together until all seams are completed.
- Seams are worked by holding 2 squares with right sides together, inserting the hook through the back loops only of each square, and making a slip stitch join. If your join appears to be pulling tight, switch to a larger hook for seaming.
The squares are joined in continuous rows, square by square, until an entire row is complete. You will only cut your yarn at the end of each row. Join all horizontal rows first, then join the vertical rows. When you are happy with your layout, begin joining as follows:
Joining Squares
Horizontal Join
Using your main colour, take the first square of Row 1 and the first square of Row 2. Holding right sides together, place hook through both ch-2 corner spaces. Ch 1, 2 sc in the ch-2 corner space of both squares, sl st (loosely) in back loop only in each st of both squares across to the next ch-2 sp, 1 sc in ch-2 sp. *Pick up your next 2 squares, 1 sc in next ch-2 sp, sl st in back loop only in each st of both squares across, 1 sc in next ch-2 sp; repeat from * across the row, making 2 sc in the final ch-2 sp. Fasten off.
Continue joining the remaining rows in the same way until you have 12 strips of 4 squares each. Fasten off yarn.
Vertical Join
Turn the partially joined shawl and work the unjoined edges in the same way as the horizontal seams, crocheting over the tops of the horizontal seams.
Tip: Make a ch-1 over the seams between each pair of 2 sc to keep the join neat.
Fasten off and weave in all ends.
Border
Using a 3.5mm hook, join yarn in any corner ch-2 sp.
Ch 1, (1 sc, picot, 1 sc) in corner ch-2 sp, *1 sc in each of next 3 sts, picot, 1 sc in next st; repeat from * around, working as follows:
- Work 1 sc in each ch-2 sp where squares meet.
- Work (1 sc, picot, 1 sc) in each corner ch-2 sp.
- The picot, 4 sc sequence continues all the way around, with (1 sc, picot, 1 sc) worked at each corner.
Fasten off and weave in all ends.
Blocking
Pin out shawl on a blocking mat, carefully placing pins in each picot.
Spray with water and leave to dry. This will give your finished shawl a more polished result.
More Patterns from Lacy Flower Granny Squares
Can’t get enough lacy flower squares? You may also like these other free patterns on the blog:
- Carousel Blanket, using similar flower squares in bold retro colors
- Edelweiss Blanket, with lacy flower squares in a fresh and neutral cream
- Vintage Blooms Blanket, made from a beginner-friendly flower square
PIN FOR LATER
Don’t forget to follow me on Instagram and be sure to tag me in your photos so I can see it too, @anniedesigncrochet or #anniedesigncrochet – I can’t wait to see what colours you use with this pattern!
The photographs and pattern contained on this page are the property of Annie Design Crochet.com.
You are welcome to use this pattern to make items to sell, and I would appreciate that you include a link to the free pattern with credit for the designer, thank you!
No unauthorized reproduction, in whole or in part, or distribution of this pattern or content is permitted.