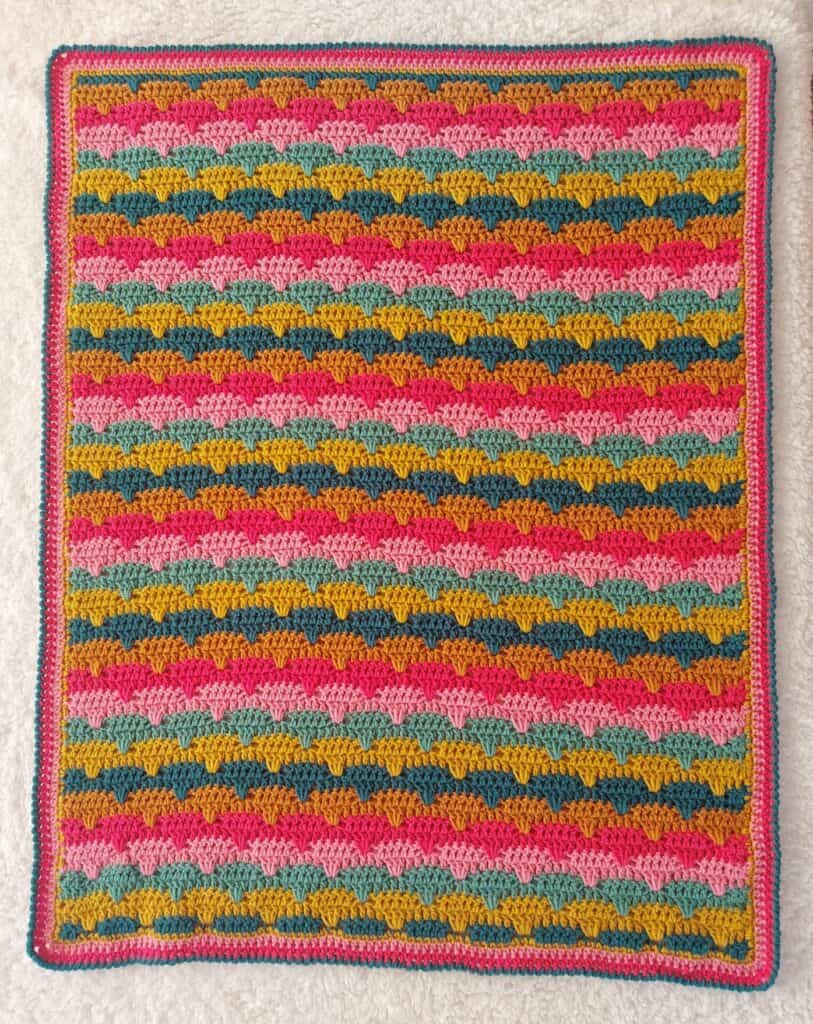
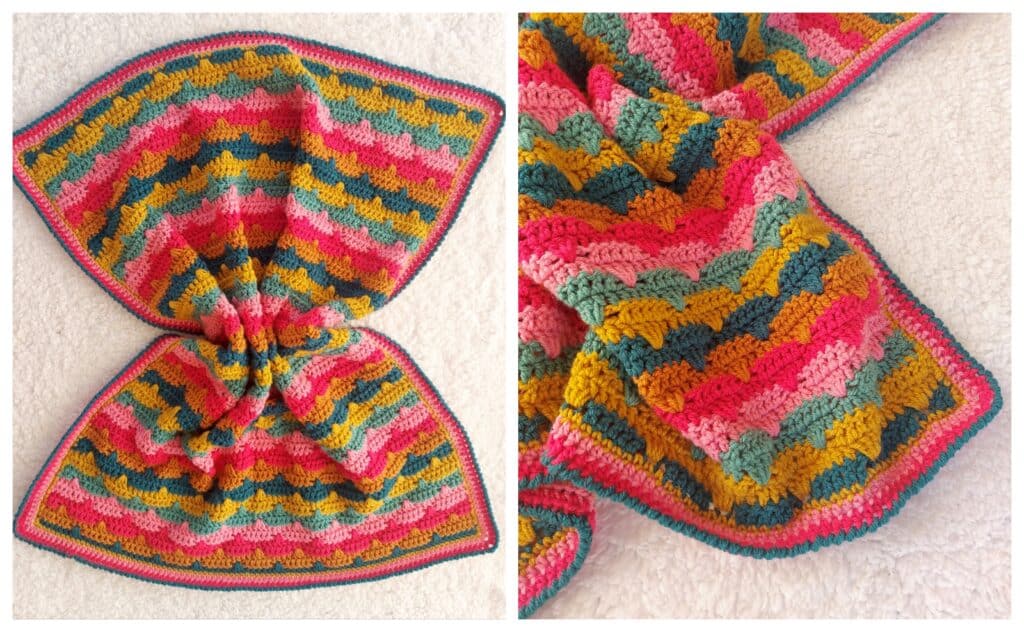
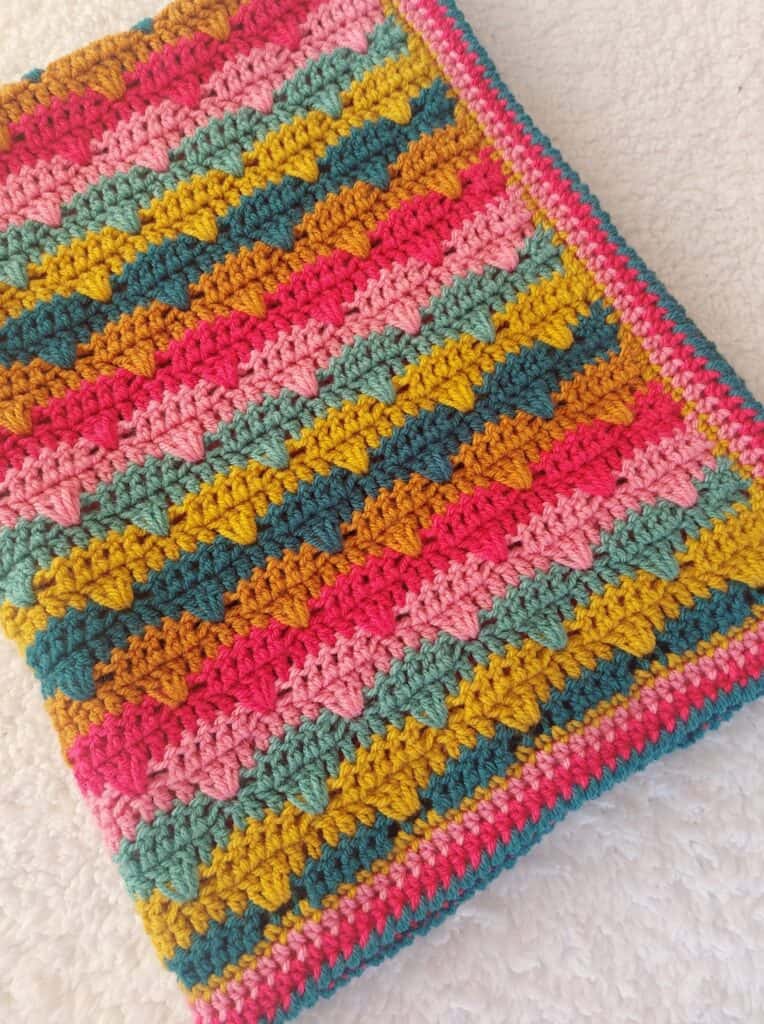
You will love this free pattern for a Scallop Shell Crochet Baby Blanket. This beginner-friendly project is not only easy and enjoyable to make but also brings a vibrant touch of color to any nursery.
Perfect for gifting, this cozy blanket will become a cherished keepsake.
Details of Crochet Scallop Shell Pattern
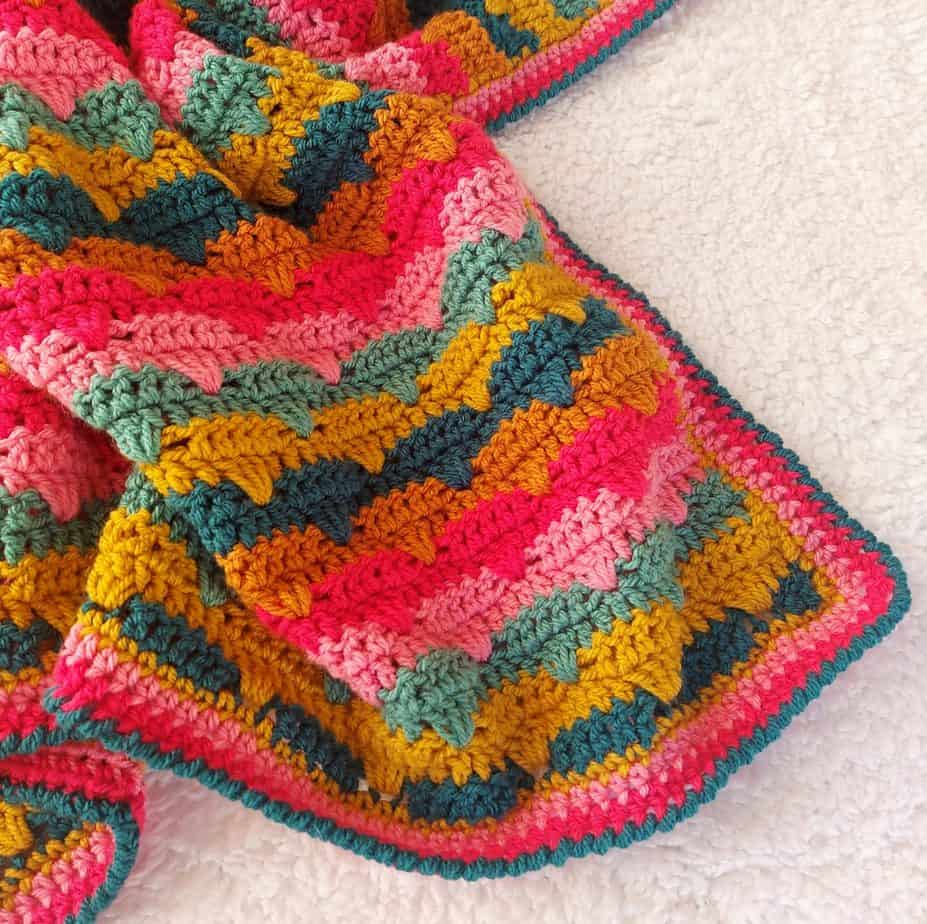
This blanket uses only very simple stitches – the double crochet stitch and chain. You will create a striped blanket that has great appeal because of the texture effect of the 3 double crochet scallops. It creates a wavy design through the pattern and each ‘scallop’ is like a small puff in the rows of crochet.
I have always loved making crochet blankets with a ‘spike stitch’. I have previously used the Granny Spike Stitch in some of my blanket designs – you can check them out at the following links:
More Free Crochet Blanket Patterns here
Stitches
The scallop feature of this blanket is easy to crochet: just 3 double crochets into the middle stitch, two rows below. This simple technique results in a beautiful puffed and textured appearance that adds depth and charm to the blanket.
If you prefer a more open stitch, you will love my tutorial for the granny ripple pattern.
How to get the Pattern for Scallop Shell Crochet Baby Blanket
- Free Pattern: Scroll down this blog post for the Instructions
- Printable PDF: Adfree printable pattern with 5 pages including all details. Thank you for your support! – Purchase on Ravelry and on Etsy
The Yarn
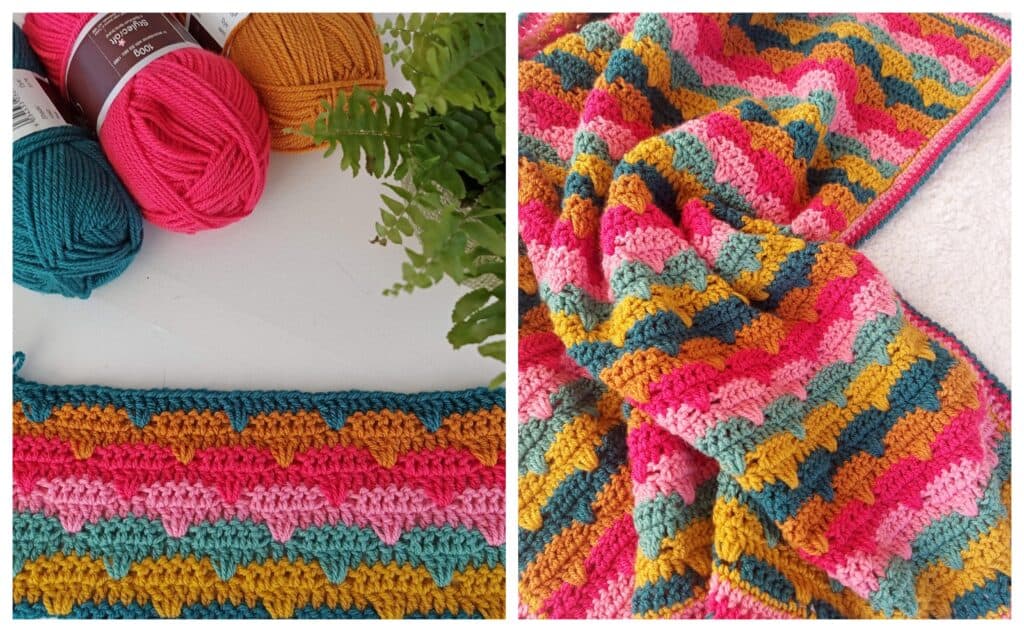
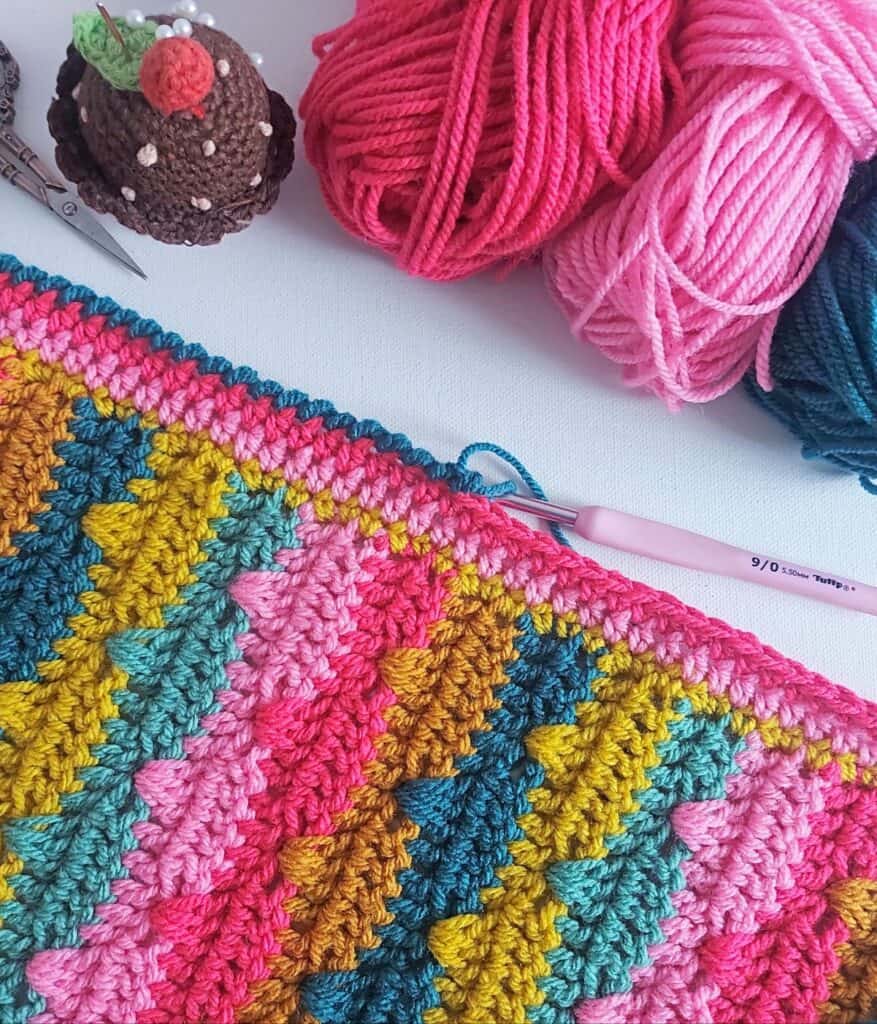
I used one of my favourite aran weight yarns – Stylecraft Special Aran. It is widely available and is a beautifully soft acrylic that is lovely to use. And easily washable which is very important for a baby blanket! Any alternative aran weight/worsted weight yarn can be used for this blanket.
I choose 6 colours to create my baby blanket. You can find the list of colours below. Enjoy experimenting with your own favourite colours!
The border edging is finished using the Crab Stitch (also called reverse single crochet) You can finish it with a final single crochet row if you prefer.
Materials
Stylecraft Special Aran – 100% Acrylic / 196m/214yrds / 100g
5.5mm Crochet Hook
One ball each of the following colours (approx. 75g of each colour)
- Yarn A: Teal (1062)
- Yarn B: Mustard (1863)
- Yarn C: Aqua (1725)
- Yarn D: Fondant (1241)
- Yarn E: Pomegranite (1083)
- Yarn F: Gold (1709)
Measurements
Blanket in pattern measures 30in x 38in [76 x 97cm] unblocked
Abbreviations
US Crochet terms
- dc double crochet
- ch chain
- st stitch
- rep repeat
UK Crochet terms
- tr treble crochet
- ch chain
- st stitch
- rep repeat
Changing Colours
Work the last yarn over of the row with the next colour, for a neat colour change
Special Stitches
Check out Instructions and Video in this post Crochet Crab Stitch
Notes
- You can use any Aran Weight/Worsted Weight yarn to make a similar sized blanket – approx. 900 – 1100m. If you make a smaller or larger blanket, keep in mind your yardage requirements will vary.
- Instructions are given to make the blanket pictured in this pattern. You can make a smaller or larger blanket by chaining a shorter or longer foundation chain.
- Stitch Multiple is 8 ch (+3) for foundation row
- Ch 2 at beginning of a row always counts as your first dc
- The pattern is written in US Crochet Terms
- Gauge is not important for this pattern
Colour Sequence
Row 1 – Yarn A
Repeat [2 rows Yarn B, 2 rows Yarn C, 2 rows Yarn D, 2 rows Yarn E, 2 rows Yarn F, 2 rows Yarn A]
You will finish the sequence with final row – Yarn A (instead of 2 rows)
Instructions for Crochet Scallop Baby Blanket
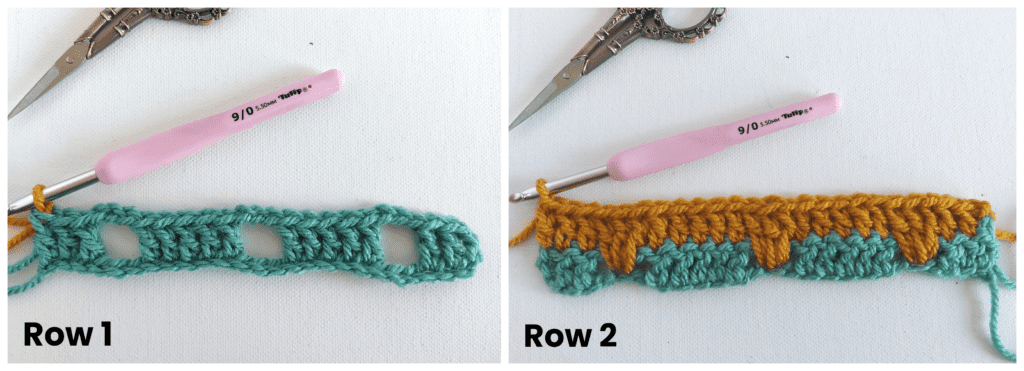
With Yarn A chain 91
Row 1: Dc in 4th ch from hook (counts as 2 dc), dc in next ch, * ch 3, skip 3 ch, dc in next 5 ch; rep from * across until 6 ch remain, ch 3, skip 3 ch, dc in last 3 ch. Fasten off yarn A. Turn.
Row 2: With Yarn B, ch 2 (counts as 1 dc here and throughout), dc in next 2 sts, * work 3 dc (loosely) in centre ch (of 3 skipped chs) in foundation row below, dc in next 5 sts; rep from * across until 3 sts remain, dc in last 3 sts. Turn.
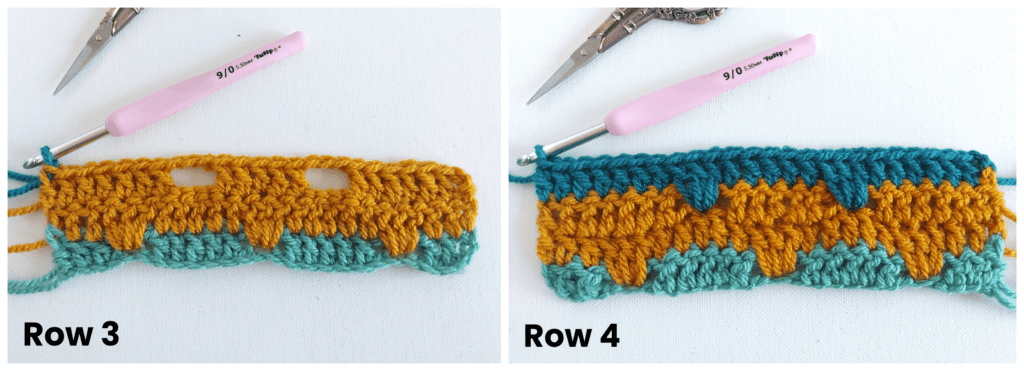
Row 3: Ch 2, dc in next 6 sts, * ch 3, skip 3 sts, dc in next 5 sts; rep from * across until 2 sts remain, dc in last 2 sts. Fasten off yarn B. Turn.
Row 4: With Yarn C, ch 2, dc in next 6 sts, * work 3 dc (loosely) over the next ch-3 sp into the middle stitch 2 rows below, dc in next 5 sts; rep from * across until 2 sts remain, dc in last 2 sts. Turn.
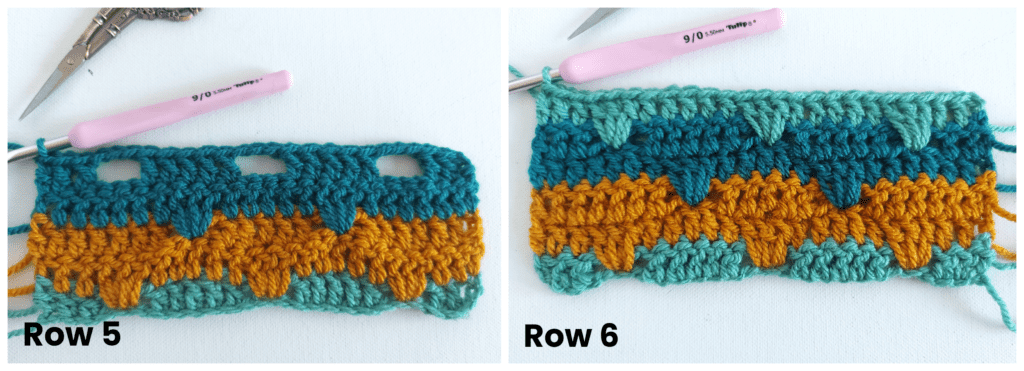
Row 5: Ch 2, dc in next 2 sts, * ch 3, skip 3 sts, dc in next 5 sts; rep from * across until 6 sts remain, ch 3, skip 3 sts, dc in last 3 sts. Fasten off yarn C. Turn.
Row 6: With Yarn D, ch 2, dc in next 2 sts, work 3 dc (loosely) over the next ch-3 sp into the middle stitch 2 rows below, * dc in next 5 sts, work 3 dc (loosely) over the next ch-3 sp into the middle stitch 2 rows below; rep from * across until 3 sts remain, dc in last 3 sts. Turn.
Row 7: Ch 2, dc in next 6 sts, * ch 3, skip 3 sts, dc in next 5 sts; rep from * across until 2 sts remain, dc in last 2 sts. Fasten off yarn D. Turn.
Row 8: With Yarn E, ch 2, dc in next 6 sts, * work 3 dc (loosely) over the next ch-3 sp into the middle stitch 2 rows below, dc in next 5 sts; rep from * across until 2 sts remain, dc in last 2 sts. Turn.
Row 9 – 73: Rep rows 5 – 8 for the remainder of the pattern, finishing with Yarn A for the final row. Fasten off and weave in all threads.
Border
Round 1: Join in Yarn B, ch 1, sc evenly around 4 sides of blanket, working (1sc, ch2, 1sc) in each corner. Join to beg ch and fasten off yarn.
Tip – On the 2 long sides, I worked 1sc in each ch-2 row end and 2sc in each dc row end. Experiment and see what works for your tension.
Round 2: Join in Yarn D, ch 1, hdc in each st around, working (1hdc, ch2, 1hdc) in each corner. Join to beg ch and fasten off yarn.
Round 3: Using Yarn E, repeat round 2. Fasten off yarn.
Round 4: Using Yarn A, work crab stitch (reverse sc) in each st and ch sp around edge of blanket. Fasten off yarn and weave in all threads.
You can purchase the ad-free PDF version of this pattern on Ravelry and Etsy
The PDF is designed for printing. Thank you for your support!
Find more Free patterns here
If you make this pattern, don’t forget to follow me on Instagram and be sure to tag me in your photos so I can see it too, @anniedesigncrochet or #anniedesigncrochet – I can’t wait to see what colours you use with this pattern!
The photographs and pattern contained on this page are the property of Annie Design Crochet.com.
You are welcome to use this pattern to make items to sell, and I would appreciate that you include a link to the free pattern with credit for the designer, thank you!
No unauthorized reproduction, in whole or in part, or distribution of this pattern or content is permitted.
Hi Carmen, I am about half way thru the rows and this blanket pattern is great. Its clever how the stitches fit into the 3 chain gap. Im using 10 ply cotton with a 5mm hook and its working up really well.
You have to be careful to get that last stitch right in each row too. It likes to hide doesn’t it?
Thank you for another great pattern
Sandy 🧶
That last stitch has to be watched! When I teach crochet it is one of the first things I show pupils as it often gets done incorrectly. Thank you so much and I appreciate your feedback:)
Thank you for written crochet patterns. I’m from the old school and do appreciate them. Would like more of these!!!
Thank you!
The pattern is brilliant but I think I’ve done something wrong. Its ended up more of a parallelogram than a rectangle. When you turn do you chain 1 and then start the next row instructions by chaining 2 or do you just chain 2 without chaining 1 first? I hope that makes sense 🙂
Oh dear! You start each row with a ch 2 (which counts as your first dc) so you don’t work into the very 1st stitch. There is a photo tutorial of the first rows which should help. I hope you get it sorted!
Hi! Yes I think that was what I was doing wrong. I forgot to skip the first stitch. Its working perfectly now! Thanks again for a beautiful pattern!
I am in the middle of three projects and then am excited to try the blanket. Your instructions are clear, concise and perfect. I thank you for them, your articles, your knowledge and talent. If,…no, when I complete one of your projects, I will post so you can see. Thanks again for sharing!
Thank you!