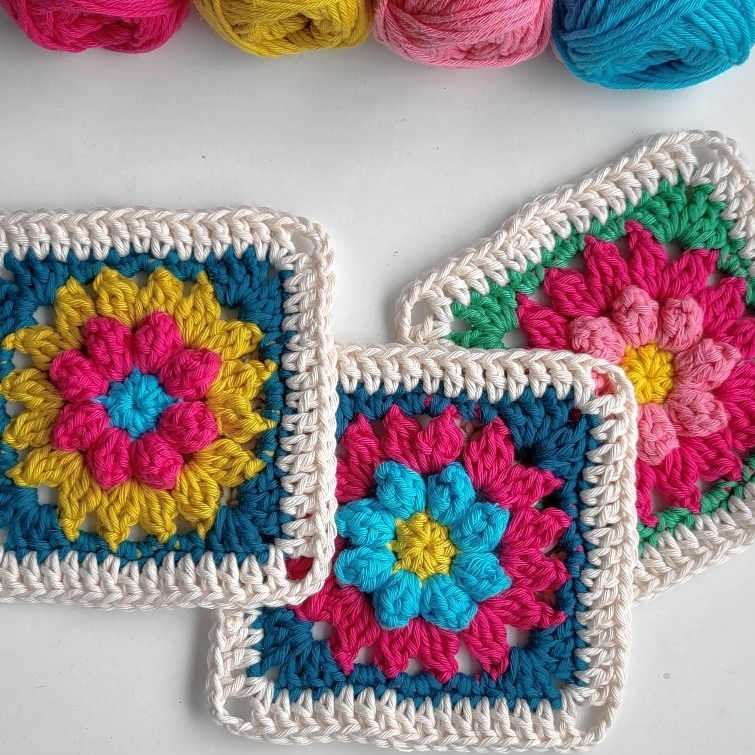
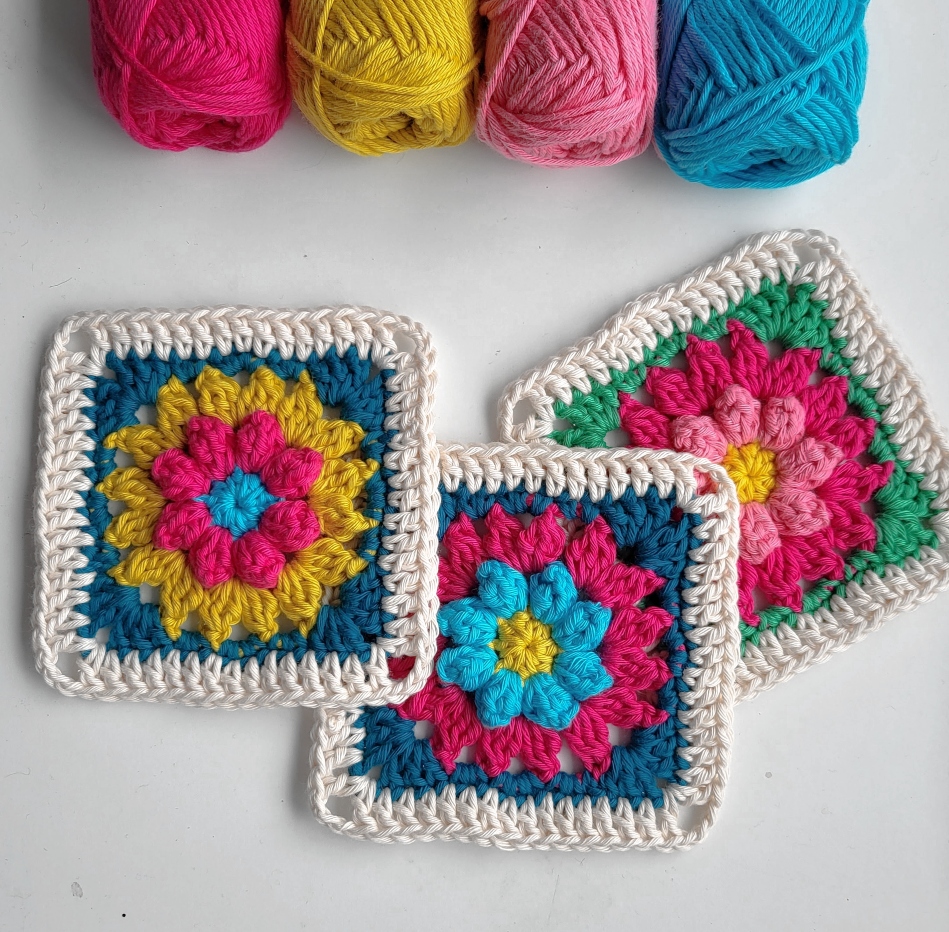
You will love this pretty crochet flower granny square pattern featuring popcorn stitches for added texture.
If you want to try something different than the traditional granny square, this is fun to make and perfect for your next crochet project!
The free crochet pattern below includes a helpful photo tutorial and ideas for how to use your flower granny squares.

- Free Pattern: Scroll down this blog post for the written pattern
- Printable ad-free PDF: Ad-free printable pattern with 5 pages including all details. This helps me continue to provide free patterns. Thank you for your support!
- Purchase on Ravelry
More about the Flower Granny Square Pattern
This beautiful flower granny is an easy pattern using basic stitches, including single crochet and double crochet. You will start with a round of half double crochet stitches, and then make some popcorn stitches for the 3-d flower center.
Double crochet cluster stitches form the next round and then you will square off your circle with some further rounds.
There are so many creative ways to use different color combinations to change the look of the squares! Go bold with bright colors, or keep it subtle with pastels.
Think seasonal colors like warm oranges and yellows for summer or cool blues, green and mustard for a winter palette.

More Crochet Square Flower Patterns
Check out more free crochet flower square patterns on the blog.
- African Flower Square – this beautiful pattern is very addictive!
- Sunflower Granny Square – also uses popcorns stitches for the flower petals
- Blaithin Blanket Cal – includes 10 free crochet flower square patterns!
- Crochet Lace Flower Square – for a floral touch to your projects!
- Solid Granny Square – for a crochet square with no gaps!
- Vintage Lace Flower Square – add a touch of crochet lace to your projects
- Textured Granny Square – each round uses a different stitch!
Best Yarn for Crochet Squares
The square pattern is easy to modify with different yarn weights. A worsted weight yarn and 5.5 mm crochet hook would be perfect to make blankets. This hook size would give the squares the drape you will need.
If using a dk weight yarn, a 4 mm or 4.5 mm crochet hook would work great.
I used a worsted weight cotton yarn and a 4.5 mm hook to make my squares. I plan to make a pillow with my crochet squares so a cotton yarn is easy to wash when needed. I used a slightly smaller hook than recommended to make my squares firm.
Crochet Projects for the Flower Square
- Make a Blanket – Make lots of squares for a crochet square blanket. You can use a single color for each square or use your colors of choice. Anything works really! Once you’ve made enough squares, whip stitch them together to create a cozy and colorful blanket.
- Make a Pillow – Combine several squares to create a pillow. You will need about 16 squares for the front of your cushion.
- Make a Bag – The flower square can also be used to create amazing colorful bags! You can use a few squares to make a small clutch or combine many squares to make a larger tote. Add some straps and a lining, and you’ll have a one-of-a-kind bag that’s perfect for carrying your essentials.
- Embellish a Scarf – Another way to use the squares is to embellish a scarf. You can sew a few squares onto the ends of a plain scarf to add some color and texture. Check out my Summer crochet scarf with granny squares for inspiration!

Free Pattern for a Crochet Flower Granny Square
You can find the written instructions below, with a photo tutorial further down the page
Materials
- Small amounts of yarn in 5 different colors
- Crochet hook
- Yarn needle
You can use any weight yarn for this pattern and a matching hook
Measurements
Sample shown is 5 x 5 in [12.5 x 12.5 cm] using worsted cotton weight yarn and 4.5mm hook
Abbreviations
US Crochet terms
- sl st – slip stitch
- sc – single crochet
- hdc – half double crochet
- dc – double crochet
- ch – chain
- st – stitch
- rep – repeat
- beg – beginning
Notes
- The pattern is written in US crochet terms
- Read through special stitches before you begin
- Use an invisible join (Instructions below) for your final round for a neat finish
- I recommend you block your crochet squares when finished. It will make joining them together much easier
Special Stitches
- Beg Popcorn (beg PC): Ch 3, work 3 dc in sp/st indicated in pattern, remove hook from the last loop and insert into the top of the beg ch 3. Now insert hook back into the last loop and pull this loop through. Pull tight.
- Popcorn (PC): Work 4 dc in sp/st indicated in pattern, remove hook from the last loop and insert into the top of the first tr, insert hook back into the last loop and pull this loop through. Pull tight.
- Double Crochet 2 together – dc2tog (cluster): Yarn over, insert hook in next st, yarn over and pull up a loop (3 loops on hook), yarn over and pull through 2 loops (2 loops left on hook), yarn over, insert hook in next st, yarn over, pull up a loop, yarn over, pull through 2 loops, yarn over and draw yarn through all 3 loops on hook.
- Double Crochet 3 together – dc3tog (cluster): Yarn over, insert hook in next st, yarn over and pull up a loop (3 loops on hook), yarn over and pull through 2 loops (2 loops left on hook), (yarn over, insert hook in next st, yarn over, pull up a loop, yarn over, pull through 2 loops) 2 times, yarn over and draw yarn through all 4 loops on hook.

Written Instructions for the Flower Square
Start with a Magic Ring (MR)
Round 1: Ch 1 (does not count as a st), 8 hdc in MR. Join with a sl st to 1st hdc, fasten off – 8 hdc
Round 2: Join next colour in any st, beg PC, ch 3, * PC in next st, ch 3; rep from * in each st around. Join with a sl st to 1st ch-3 sp, do not fasten off – 8 PC, 8 ch-3 sps
Round 3: Ch 3, dc2tog (counts as dc3tog), ch 3, dc3tog in same sp, ch 3 * dc3tog, ch 3, dc3tog, ch 3, in next ch-3 sp; rep from * in each ch-3 sp around. Join with a sl st in 1st ch-3 sp, fasten off – 16 dc3tog, 16 ch-3 sps
Round 4: Join next colour in any ch-3 sp between two adjacent pairs of PC, ch 1 (does not count as a st), 2 sc in same sp, * [ 3dc, ch 2, 3 dc] in next ch-3 sp, 2 sc in next ch-3 sp, 3 sc in next ch -3 sp, ** 2 sc in next ch-3 sp; rep from * 2 times, and from * to ** once. Join with a sl st to beg sc, fasten off – 24 dc, 28 sc
Round 5: Join next colour in any st, ch 3 (counts as 1dc), work 1 dc in each st around, working [1 dc, ch 3, 1 dc] in each corner ch-3 sp. Join with an invisible join, fasten off – 60 dc, 4 ch-3 sps
Instructions with a Photo Tutorial
Start with a Magic Ring (MR)
Round 1: Ch 1 (does not count as a st), 8 hdc in MR. Join with a sl st to 1st hdc, fasten off – 8 hdc
Round 2: Join next colour in any st, beg PC, ch 3, * PC in next st, ch 3; rep from * in each st around. Join with a sl st to 1st ch-3 sp, fasten off – 8 PC, 8 ch-3 sps

Round 3: Join next colour in any ch-3 sp, ch 3, dc2tog (counts as dc3tog), ch 3, dc3tog in same sp, ch 3 * dc3tog, ch 3, dc3tog, ch 3, in next ch-3 sp; rep from * in each ch-3 sp around. Join with a sl st in 1st ch-3 sp, fasten off – 16 dc3tog, 16 ch-3 sps

Round 4: Join next colour in any ch-3 sp between two adjacent pairs of PC, ch 1 (does not count as a st), 2 sc in same sp, * [ 3dc, ch 2, 3 dc] in next ch-3 sp, 2 sc in next ch-3 sp, 3 sc in next ch -3 sp, ** 2 sc in next ch-3 sp; rep from * 2 times, and from * to ** once. Join with a sl st to beg sc, fasten off – 24 dc, 28 sc

Round 5: Join next colour in any st, ch 3 (counts as 1dc), work 1 dc in each st around, working [1 dc, ch 3, 1 dc] in each corner ch-3 sp. Join with an invisible join, fasten off – 60 dc, 4 ch-3 sps

Should you block your Crochet Square?
Blocking your square will make a difference to the finished project you are making. Blocking will ensure each square is the perfect size and shape.
Pin each flower square in place, spray with water and leave to dry. Your square will look neat and polished before joining.
Invisible Joining (Invisible Needle Join)
Complete the final stitch of your round. Cut yarn leaving a long tail. Drop your hook and pull the tail all the way through the stitch and thread the yarn tail through a yarn needle.
- Insert the needle from the front to the back under the top two loops of the first complete stitch made to your left (after the beg ch 3). See Picture 1
- Pull yarn through. See Picture 2
- Insert your needle in the back loop only of the last stitch made to your right. See arrow on Picture 3
- Pull through loop gently and weave in ends. See Picture 4
I hope you enjoy this pattern! Pin the image below to your favorite board to save for later.

Don’t forget to follow me on Instagram and be sure to tag me in your photos so I can see it too, @anniedesigncrochet or #anniedesigncrochet – I can’t wait to see what colours you use with this pattern!
The photographs and pattern contained on this page are the property of Annie Design Crochet.com.
You are welcome to use this pattern to make items to sell, and I would appreciate that you include a link to the free pattern with credit for the designer, thank you!
No unauthorized reproduction, in whole or in part, or distribution of this pattern or content is permitted.

This was a really lovely pattern. I made four initially, and then joined them together and continued to add rounds as the fancy took me! Ended up with a lovely throw that is warming my feet as I type. Would include a photo, but there doesn’t seem to be the option in here. Thank you for your lovely designs, they keep me busy!!
Thank you so much! I would love to see your throw! You can send me an image to @carmen@anniedesigncrochet.com
Thanks for photo tutorial with detailed instructions ! I am 80+(retd.architect from India )
love making crochet and greetig cards for the loved ones (the budget is very tight )yarns here quite expensive Just for an hobby!
I wanted to know ofany specific reason for not making equal SC.stitches in the 3chain spaces between corners 2sc..3sc..2sc. ??
Thanks again for free design !
I used what worked best for my tension but feel free to add or exclude stitches – waht ever works best for you! And thank you!