I have now released all 10 squares of the Bláithín Blanket CAL and I could not be happier with the response to this stash busting project! I have loved seeing all the creativity from everyone that took part and the beautiful blankets made from stash that are now appearing every day!
The Blaithin Blanket CAL is over now, but all information and patterns for the squares will always be available for Free on my Blog.
Here is my 2nd Bláithín Blanket using all the squares that I shared for the patterns!
- Introduction – Bláithín Blanket CAL
- Square 1 – Bramble Square and Solid Square
- Square 2 – Ragwort Square
- Square 3 – Cosmos Square
- Square 4 – Hydrangea Square
- Square 5 – Primula Square
- Square 6 – Bellflower Square
- Square 7 – Queen Anne’s Lace
- Square 8 – Love-In-A-Mist Square
- Square 9 – Aster Square
- Square 10 – Forget-Me-Not
- Final Week – Joining and Border
Stash-busting Blanket Information
I wanted this CAL to be relaxing and friendly and be a real Stash Buster. You will need a few balls (approx. 1000m) of your main colour for joining and border. You have creative freedom to choose your own colours, and I want to encourage you to do so, and have fun!

Need more inspiration? You can check out my other Crochet Blanket Patterns here.
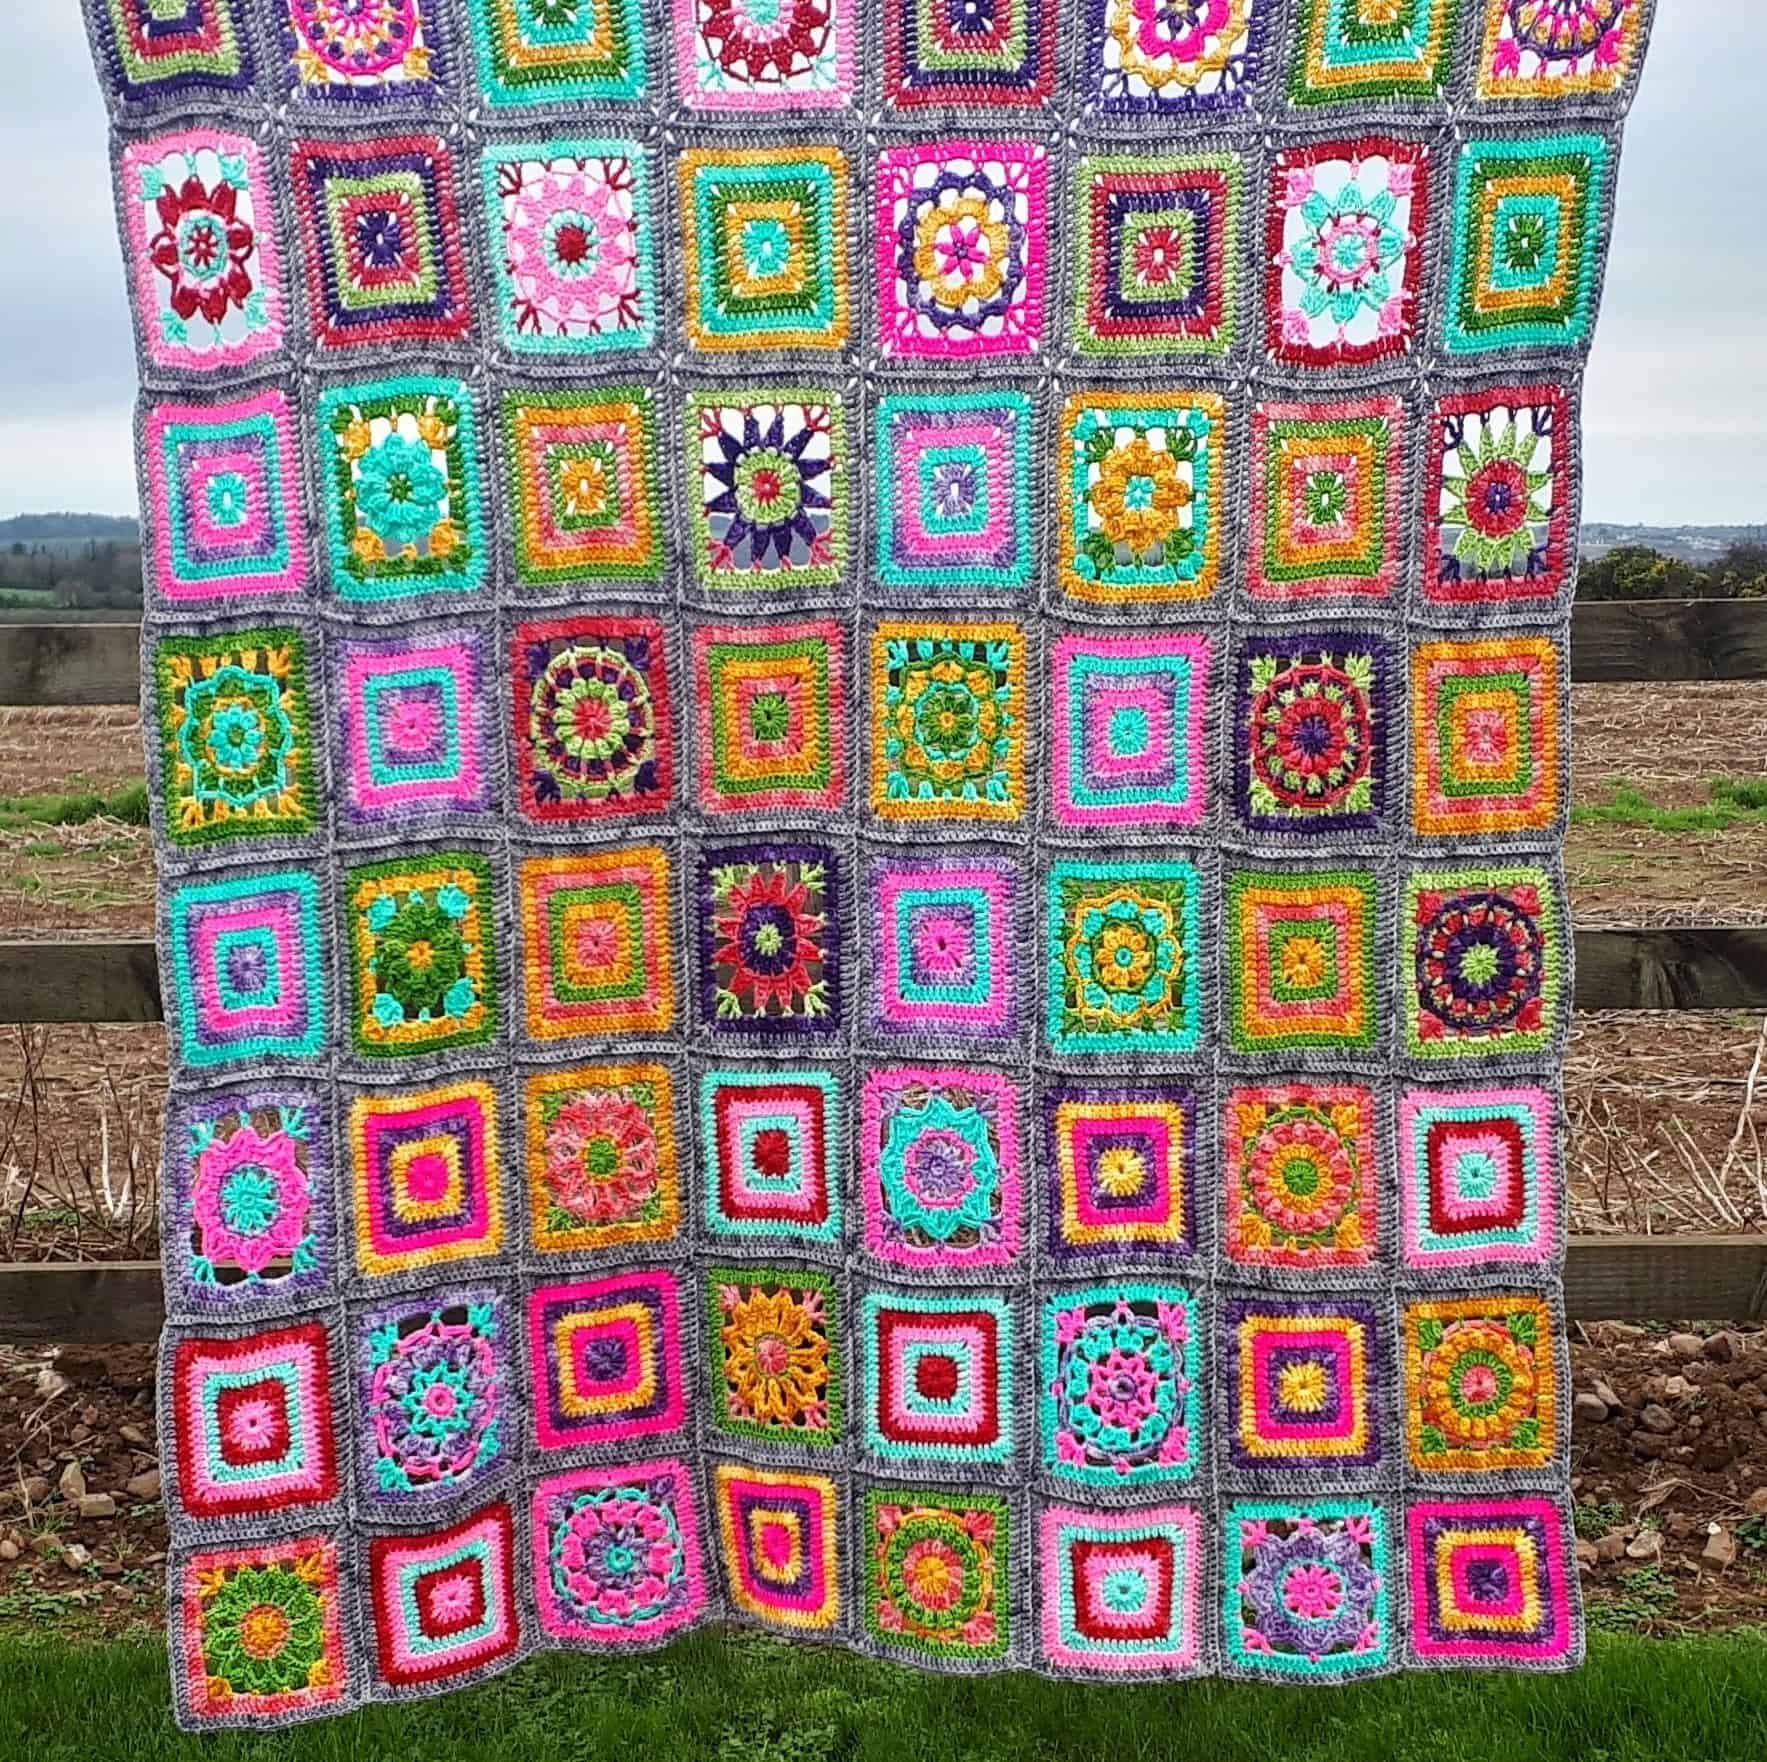
A selection of Completed Bláithín Blankets
Several people have completed the Bláithín blanket CAL and I wanted to share some pictures of their beautiful work! If you search for #blaithinblanketcal on Instagram you will be so inspired by the beautiful makes!
My heart skips a beat every time I see a new blanket appearing!
Everybody has their preferred method of joining squares, but if you need any tips, the wonderful Moogly has a long list of joining methods in this post.
How to Join Crochet Squares
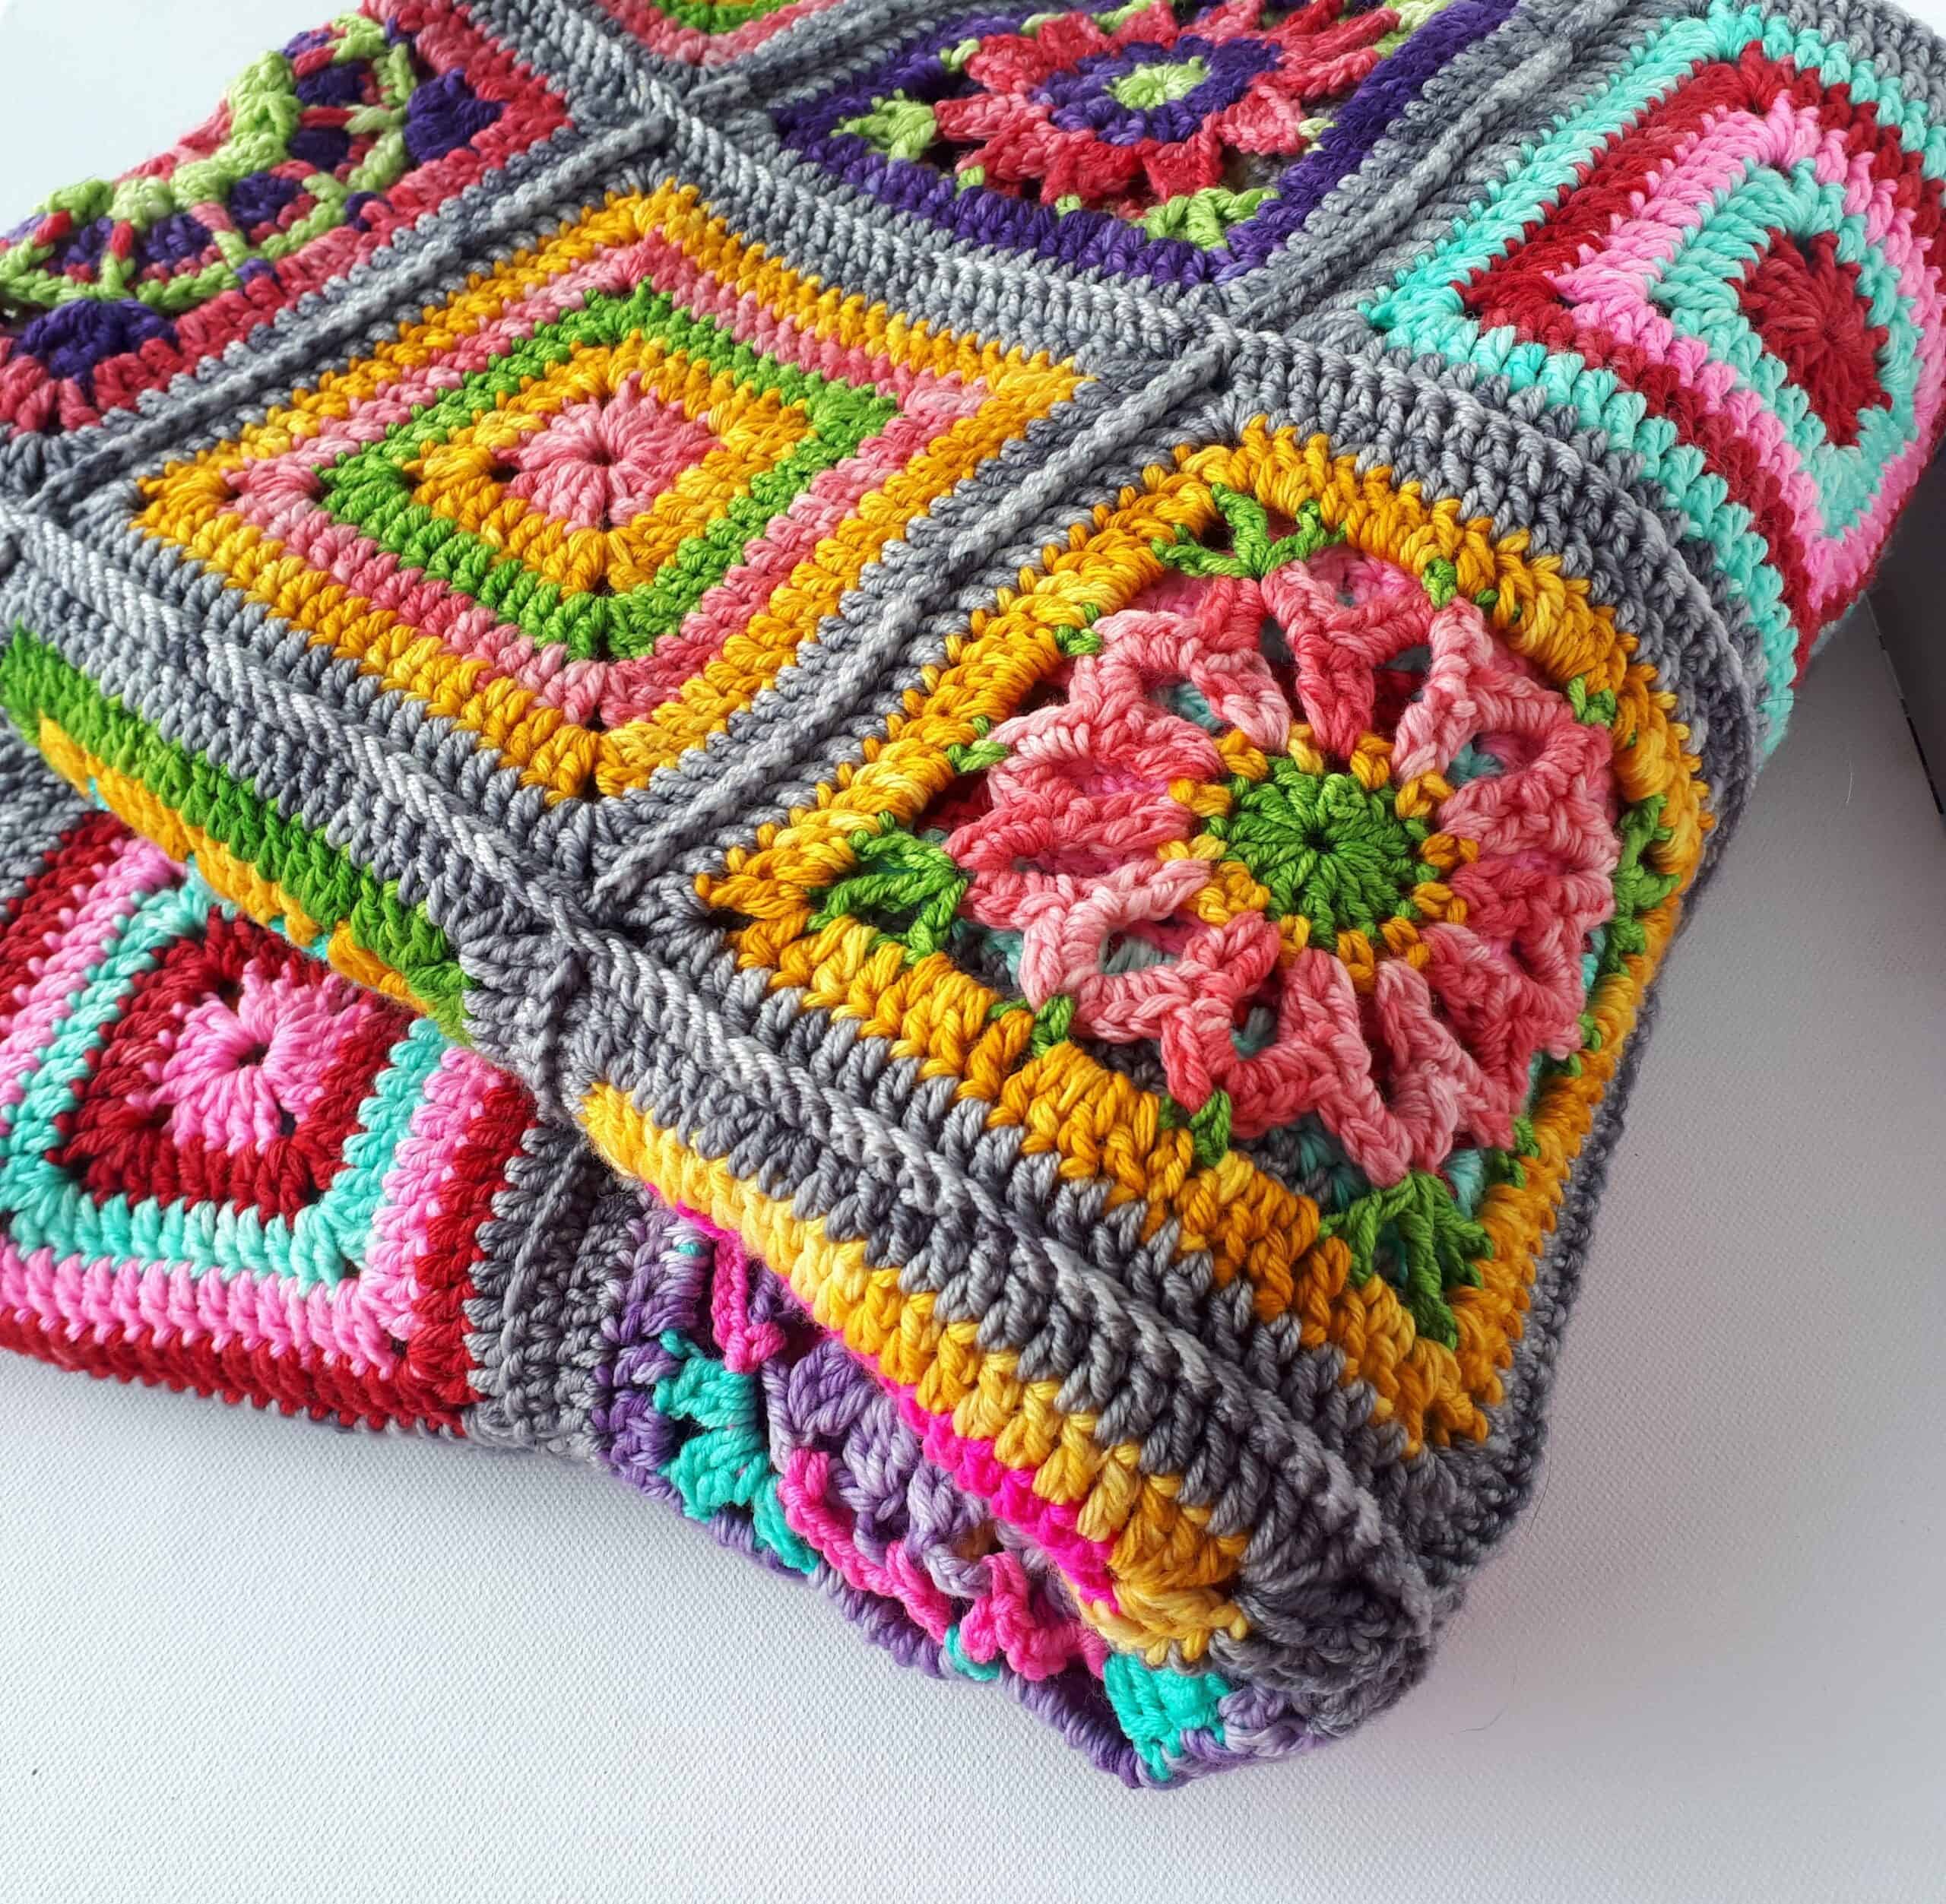
Here is a picture of my original Bláithín Blanket and the method I used to join the squares. I wanted a seam on the outside of my squares, but you may prefer a different method!
It is a good idea to lay out your squares on a floor and take a picture of your final design as a reference.
Notes for Joining Blanket Squares
- You can use a yarn needle to sew squares together if preferred.
- Joining instructions are given for blanket pictured. You can also make a larger or smaller blanket from this guide. Blanket above uses 72 squares in total
- Layout squares in rows of 8 x 9 squares. Refer to image of the complete blanket as a guideline.
- It may be helpful to use stitch holders to connect the unworked sides and edges of the squares so the strips of squares will hold together until all seams are completed.
- Seams are worked by holding 2 squares with WS together and inserting the hook through both loops of each square and making a sc join. If your join appears to be pulling tight, use a larger hook for seaming.
- The instructions are in US crochet terms. SC is a DC in UK crochet terms, and DC is a TR in UK crochet terms.
Arrange the squares according to the layout given above or use your own layout. The joining of the squares is done in continuous rows, square by square until an entire row is finished. You will only cut your yarn when you reach the end of a row.
First, join all the horizontal rows of the blanket and then join the vertical rows. When you are happy with the layout begin to join the squares as follows:
Joining Squares (US Crochet Terms)
You will join each row to the one below as follows:
Horizontal Join – Using your main colour, take the first square of row 1 and the first square of row 2, and holding WS together, place hook in both ch-2 corner spaces. Ch1, 1 sc in ch-2 corner space, 1 sc in each st of both squares, across to next ch-2 sp, 1 sc in ch-2 sp, * pick up your next 2 squares, 1 sc in next ch-2 sp, 1 sc in each st of both squares across, 1 sc in next ch-2 sp; repeat from * across row.
Without breaking yarn, continue joining pairs of squares until there is a strip of 2 rows of 8 squares in each. Fasten off.
Join the third and following rows in the same way until you have 9 strips with 8 squares in each. Fasten off yarn.
Vertical Join – Turn partially joined blanket and work the unjoined squares in the same way as the Horizontal Seams, crocheting over the tops of the Horizontal Seams. (Tip – make a ch-1 over the seams between each 2 sc) Fasten off and weave in ends.

Border for Bláithín Blanket Cal
You can make your preferred border, if you have one that you like to use. I would suggest keeping it simple and use the main colour that you had for the final rounds of your squares. That way, your beautiful Flower Squares will shine!
I have given you instructions for an easy border below if you choose to use it.
Example of Border (US Crochet Terms)
Work border rounds with right side facing throughout. I made 4 rounds in total
Round 1: With MC, join in any st, ch 3, 1 dc in each st around. Where the squares meet, work 1 dc in ch-2 sp, 1 dc in centre, 1 dc in next ch-2 sp. Work [2 dc, ch 2, 2 dc] in each corner sp. Do not fasten off yarn
Rounds 2 – 4: Ch 3, 1 dc in each st around, [2 dc, ch 2, 2 dc] in each corner sp. Fasten off yarn.
Thank you so much for taking part and crocheting all the lovely Flower Squares along with me! I will be completing my own Bláithin Blanket that I made from my stash in the next few weeks, and can’t wait to share with you all.
You can find all details for this Stash Busting CAL in the Introduction Post
And here is my final blanket using all the colourful squares for each pattern. Hanging on an old gate in the sunshine, I just love it!
You might like to check out my other Free Patterns
Don’t forget to follow me on Instagram and be sure to tag me in your photos so I can see it too, @anniedesigncrochet or #anniedesigncrochet – I can’t wait to see what colours you use with this pattern!
The photographs and pattern contained on this page are the property of Annie Design Crochet.com.
You are welcome to use this pattern to make items to sell, and I would appreciate that you include a link to the free pattern with credit for the designer, thank you!
No unauthorized reproduction, in whole or in part, or distribution of this pattern or content is permitted.

I find I cannot get any of the links to the free square patterns to work…?
Hi Elizabeth. I just checked and they are all working fine. Let me know if I can help!
Wow! I love love love these.what beautiful colours and patterns. Thank you so much for sharing. I hope to use these in the village where I live in Portugal, to cover up an eye sore of a band stand. I hope to do it as a community project.
Good work on your part and thank you once again!
Girl… You should write a book! Your patterns are just marvelous! You shoul publish them as a book. You are amazing 🙂 Thank you 🤗
Thank you for this pattern. I cannot wait to have a go. All these flowers I have in my garden and I intend to make the squares the colours of the flowers outside. Some of the plain squares may not be made as some of the flowers have a number of varieties. I will have to get lost in one of the good wool shops near me. Verry dangerous. Love looking at the range.
Enjoy!
Thank you very much for your beautiful patterns!
I have many good acryl yarns and I want to crochet a big afghan.
Have a nice weekend4
Marianne