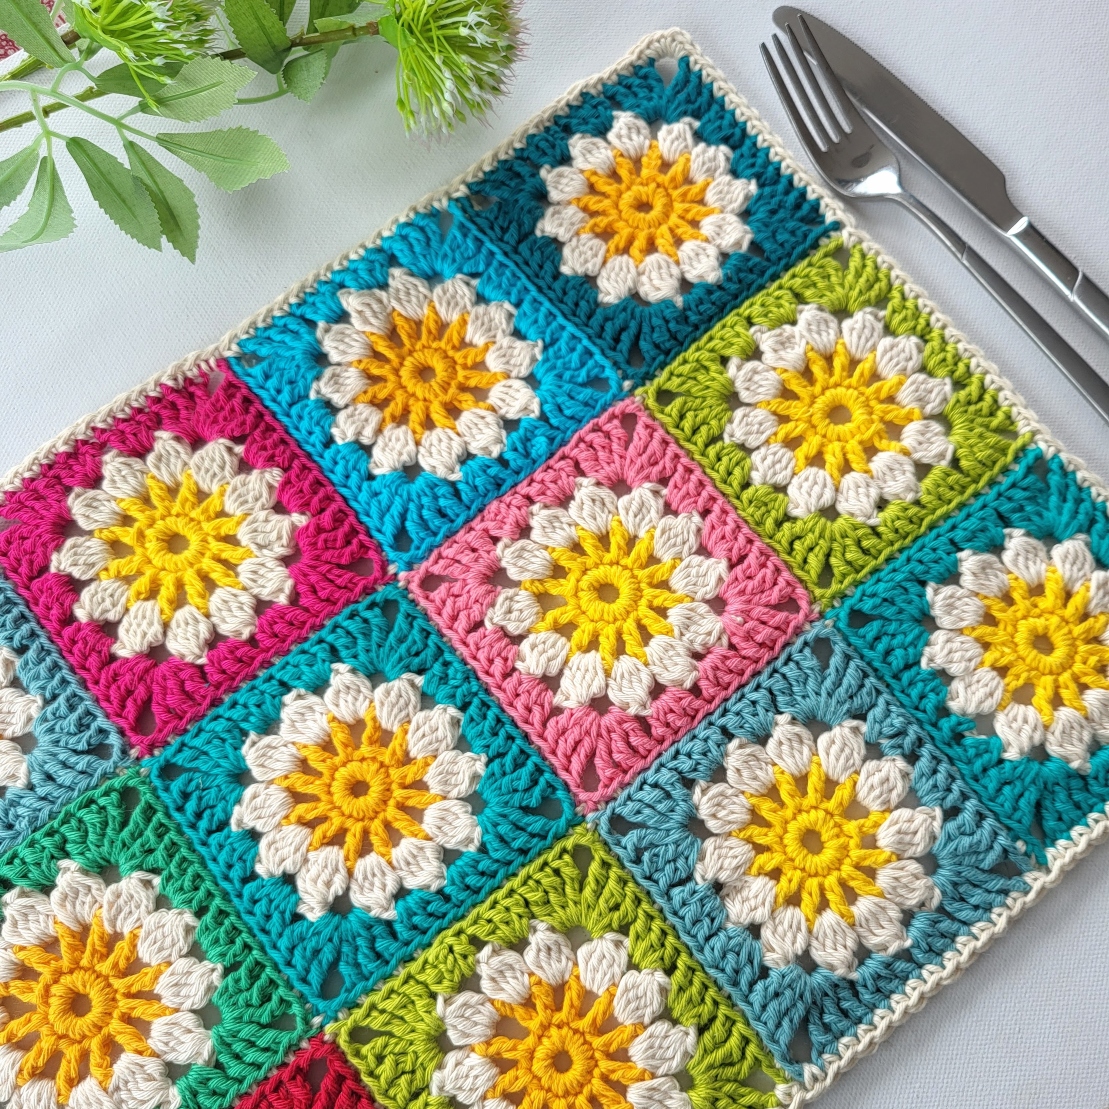
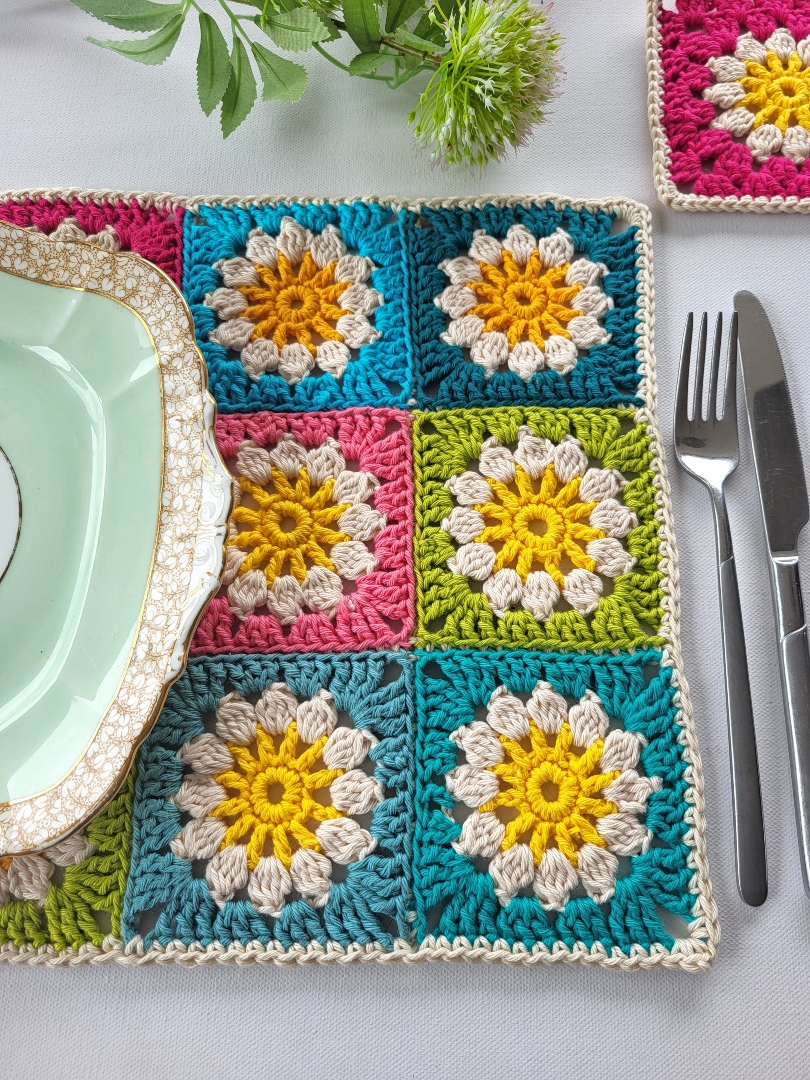
Bring sunshine to your table with this free pattern for daisy crochet placemats and coasters! The charming daisy granny squares add a touch of whimsy to your dining table, making them a delight to use and display.
Plus, with a quick set of matching coasters, you’ve got a beautiful handmade gift!
Inspired by the daisy square pattern I used in this crochet baby blanket and the daisy granny square bag, I wanted to use the flower square in another crochet project. It was fun choosing colors and I was so happy with the result.
The free pattern below also includes a pattern for crochet coasters for a coordinated look.
How to Get the Pattern for the Crochet Placemat
- Free Crochet Pattern: Scroll down this blog post for the free pattern.
- Printable PDF: Ad-free PDF pattern including all details. This helps me continue to provide free patterns. Thank you for your support! Purchase on Ravelry and on Etsy
PIN FOR LATER

Dress Up Your Table with Crochet Placemats
Imagine setting your dinner table for a summer brunch or a celebratory birthday party. These crochet daisy placemats and coasters add a pop of sunshine and a delightful retro vibe to all special occasions.
Crochet placemats are also very functional. Made with durable cotton yarn, they protect your table surface from spills and scratches. Plus, they’re easy to care for – simply toss them in the washing machine for a quick refresh!

More Free Crochet Patterns
- Crochet Square Coaster
- Crochet Doily Coaster
- Crochet Flower Coasters
- Daisy Flower
- Crochet Flower Bunting
How to Make a Daisy Square Crochet Placemat
The daisy granny square is an easy pattern and the little pile of crochet daisy squares work up quickly. You can add more squares to make a bigger placemat if you wish. Each square measures 3.5 x 3.5 inches.
Join the squares with a slip stitch seam as I did, or opt for another method like the whip stitch for a different look. A simple single crochet border gives your placemat a polished edge.
A light steam blocking is the perfect finishing touch to even out the stitches and create the flat finish on the placemat.
Choosing the Perfect Yarn for Your Placemats
- DK weight yarn: Cotton is the best yarn for placemats and coasters. It’s durable, keeps its shape well, and is machine washable – perfect for handling spills and everyday use. I used DK cotton yarn and a 3.5mm hook for this project.
- Worsted Weight Yarn: If you prefer a thicker and more substantial placemat, consider using worsted weight cotton. You’ll need a larger hook size (around 4.5mm) to achieve the correct gauge. This option is a great way to use up any leftover cotton yarn in your stash! Remember, your placemats will come out larger with the thicker yarn.
Color Inspiration: I’ve included a list of colors in the pattern below, but feel free to get creative and choose different colors that complement your existing decor.
- Printable PDF: Ad-free PDF pattern including all details. Ravelry and on Etsy
- This helps me continue to provide free patterns. Thank you for your support!

Daisy Square Crochet Placemat Pattern
You can find a photo tutorial for the square in this blog post:
Daisy Granny Square Blanket
Materials
- Hobbii – Rainbow Cotton 8/6 Sport – 100% cotton/115yds/105m/50g
- MC – cream (002), CC – yellow (055), rose (044), petunia pink (087), christmas red (086), dark green (022), steel blue (078), light turquoise (034), dark teal (091), petrol blue (035), green (084)
- 3.5 mm crochet hook
- Yarn needle
Measurements
- Each square measures 3.5 x 3.5 in [9 x 9 cm]
- Placemat measures 10.75 x 14.5 in [27 x 37 cm]
- Coaster measures 4.75 x 4.75 in [12 x 12 cm]
Gauge will depend on yarn used and individual tension
Abbreviations
US Crochet terms
- sl st slip stitch
- sc single crochet
- hdc half double crochet
- dc double crochet
- tr treble crochet
- ch chain
- st stitch
- sp space
- beg beginning
- rep repeat
- MC main color
- CC contrast color
- RS right side
- BLO back loop only
Special Stitches
Beg 3dc-cl (beginning 3 double crochet cluster): Ch 3, yarn over, insert hook in next st or sp, yarn over and pull up a loop (3 loops on hook), yarn over and pull through 2 loops (2 loops left on hook), [yarn over, insert hook in same st or sp, yarn over, pull up a loop, yarn over, pull through 2 loops] 2 more times, yarn over and draw yarn through all 4 loops on hook
4dc-cl (4 double crochet cluster): Yarn over, insert hook in next st or sp, yarn over and pull up a loop (3 loops on hook), yarn over and pull through 2 loops (2 loops left on hook), [yarn over, insert hook in same st or sp, yarn over, pull up a loop, yarn over, pull through 2 loops] 3 more times, yarn over and draw yarn through all 5 loops on hook
Notes
- The pattern is written in US crochet terms.
- Gauge is not important for this project.
- Blocking each square is recommended.
- Each square is worked in rounds and joined together. A simple border is worked around the edges of the main piece.
- Ch 3 at beginning of a row counts as 1 dc.
- Ch 1 at beginning of a row counts as 1 sc.
- Placemat has a total of 12 squares.
Square (make 12)
Using yellow, ch 5, sl st into first ch to form a ring.
Round 1: Ch 1, 12 sc into ring, join with a sl st into first sc – 12 sc
Round 2: Ch 4 (counts as 1 dc, ch 1), [1 dc into next st, ch1] 11 times, join with a sl st into 3rd ch of beg ch 4, fasten off yarn – 12 dc, 12 x ch-1
Round 3: Using MC, join in any ch-1 sp from Round 2, beg 3dc-cl into same space, ch 3, (4dc-cl into next ch-1 sp, ch 3) 11 times, join with a sl st to top of beg cluster. Fasten off yarn – 12 clusters, 12 x ch-3 sp
Round 4: Using any CC, join in any ch-3 sp from Round 3, ch 3 (counts as 1 dc), 2 dc in same sp, (3 tr, ch 3, 3 tr) in next ch-3 sp, [3 dc in next ch-3 sp, 2 times, (3 tr, ch 3, 3 tr) in next ch-3 sp] 3 times, 3 dc in next ch-3 sp, join with a sl st to top of beg ch 3, fasten off yarn.
Joining the Squares
- I used a slip stitch join for my squares, holding RS together and slip stitching through the back loops only
- You can use a yarn needle to sew squares together if preferred.
- Lay out squares in rows of 4 x 3 squares.
- Seams are worked by holding 2 squares with RS together and inserting the hook through the back loops of both squares and making a sl st join loosely.
Arrange the squares in your preferred layout. The joining of the squares is done in continuous rows vertically and then horizontally. You will join square by square until an entire row is finished. You will only cut your yarn when you reach the end of a row.

Border
Work border rounds with right side facing throughout.
Round 1: Join MC in any corner ch-3 sp, ch 1 (does not count as a stitch), (2 sc, ch 1, 2 sc) in same sp, * 1 sc in each st across, (working 1 sc in each sp where squares meet), to next corner ch-3 sp, (2 sc, ch 1, 2 sc) in ch-3 sp; repeat from * around all sides. Join with a sl st to beg sc. Fasten off yarn.
58 sc along each of the longer sides and 44 sc along the shorter sides.

Daisy Square Coaster
Using yellow, ch 5, sl st into first ch to form a ring.
Round 1: Ch 1, 12 sc into ring, join with a sl st into first sc – 12 sc
Round 2: Ch 4 (counts as 1 dc, ch 1), [1 dc into next st, ch1] 11 times, join with a sl st into 3rd ch of beg ch 4, fasten off yarn – 12 dc, 12 x ch-1
Round 3: Using MC, join in any ch-1 sp from Round 2, beg 3dc-cl into same space, ch 3, (4dc-cl into next ch-1 sp, ch 3) 11 times, join with a sl st to top of beg cluster. Fasten off yarn – 12 clusters, 12 x ch-3 sp
Round 4: Using any CC, join in any ch-3 sp from Round 3, ch 3 (counts as 1 dc), 2 dc in same sp, (3 tr, ch 3, 3 tr) in next ch-3 sp, [3 dc in next ch-3 sp, 2 times, (3 tr, ch 3, 3 tr) in next ch-3 sp] 3 times, 3 dc in next ch-3 sp, join with a sl st to top of beg ch 3. Do not fasten off.
Round 5: Ch 3, 2 dc in same sp, 3 dc in next sp, (3 dc, ch 3, 3 dc) in next ch-3 sp, [3 dc in next ch-3 sp, 3 times, (3 dc, ch 3, 3 dc) in next ch-3 sp] 3 times, 3 dc in next ch-3 sp, join with a sl st to top of beg ch 3. Fasten off yarn.
Round 6: Using MC, join in any st, ch 1, work 1 sc into each st around, working (2 sc, ch 1, 2 sc) into each corner ch-3 sp, join with a sl st to top of beg ch 1. Fasten off yarn.
Finishing
Pin your placemat and coaster to a blocking board to an even size. Spray with water or steam with an iron. Leave to dry.
Happy Crocheting!
Don’t forget to follow me on Instagram and be sure to tag me in your photos so I can see it too, @anniedesigncrochet or #anniedesigncrochet – I can’t wait to see what colours you use with this pattern!
The photographs and pattern contained on this page are the property of Annie Design Crochet.com.
You are welcome to use this pattern to make items to sell, and I would appreciate that you include a link to the free pattern with credit for the designer, thank you!
No unauthorized reproduction, in whole or in part, or distribution of this pattern or content is permitted.