
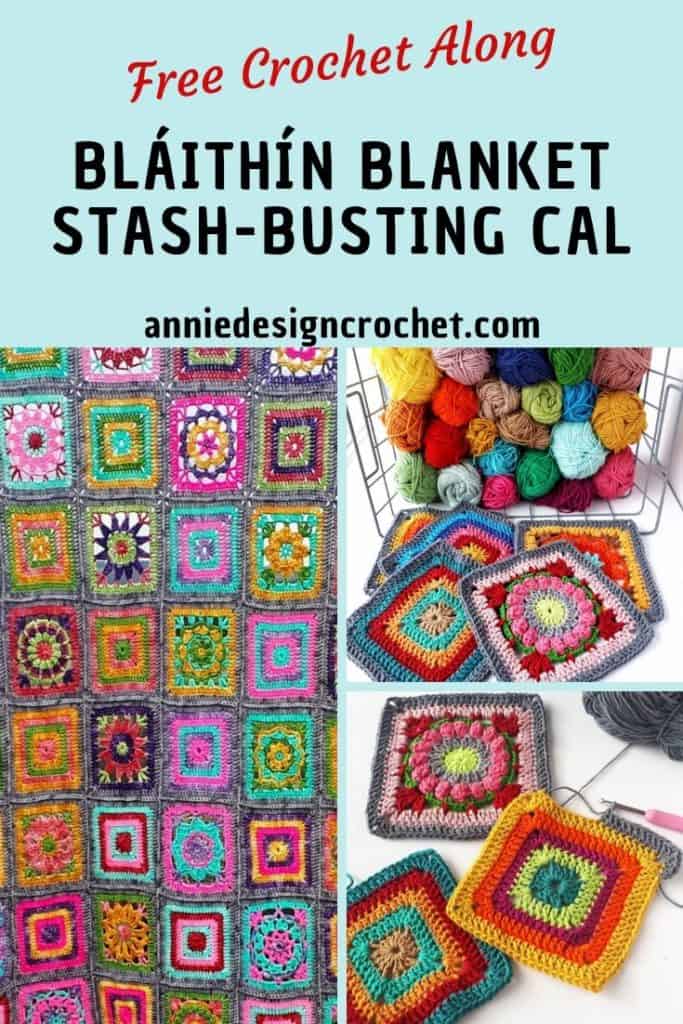
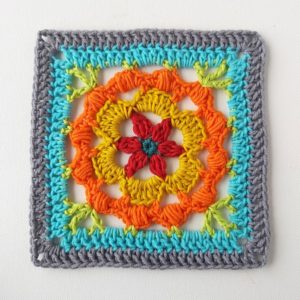
Welcome to the 6th Flower Square pattern of the Bláithín Blanket Stash Busting CAL! This crochet square is called the Bellflower Square. This flower square is an easy make with playful big Puff Stitches and a striking flower design, and it will make a lovely addition to your blanket! You will need to make 4 Bellflower Squares and 4 solid squares for this part of the CAL.
The Blaithin Blanket CAL is over now, but all information and patterns for the squares will always be available for Free on my Blog.
- No need to sign up, no worries about keeping up! Feel free to make the patterns at your own pace – they will always be available for Free on my blog.
- Share your progress on Instagram using #blaithinblanketcal

- Introduction – Bláithín Blanket CAL
- Square 1 – Bramble Square and Solid Square
- Square 2 – Ragwort Square
- Square 3 – Cosmos Square
- Square 4 – Hydrangea Square
- Square 5 – Primula Square
- Square 6 – Bellflower Square
- Square 7 – Queen Anne’s Lace
- Square 8 – Love-In-A-Mist Square
- Square 9 – Aster Square
- Square 10 – Forget-Me-Not
- Final Week – Joining and Border
I have included the patterns in US crochet terms and UK crochet terms. You will find the Instructions below in written form, and also some helpful photo tutorials.
I have included the patterns in US crochet terms and UK crochet terms. You will find the Instructions below in written form, and also some helpful photo tutorials.

Stash-busting Blanket Information
I wanted this CAL to be relaxing and friendly and be a real Stash Buster. You will need a few balls (approx. 1000m) of your main colour for joining and border. You have creative freedom to choose your own colours, and I want to encourage you to do so, and have fun!
You might like to check out my other Free Patterns
Notes
- As such, gauge is not critical in this project. What is important is that all your squares are the same size.
- My blanket is made using DK weight yarn and 4.5 mm hook and each square is 6.5in. If your tension is very loose you could use a 4mm hook
- It’s generally best to stick to the same yarn brand if possible, to avoid drastic changes in the yarn’s thickness (which can affect the size of your squares)
- You could use worsted weight (aran weight) if that is what you have. Your finished squares will be approx 8in
- The squares are designed to be all the same size after blocking. Your stitch count for final round of every square ,will be 24 dc (tr) each side of square
- Blocking will even out any minor differences in size. I pin them to my ironing board to the same size template each time, and steam them. After they cool down they will be a beautiful polished square!
- Use the same hook size throughout the CAL and block your squares to keep the size consistent.
- Check your stitch count at the end of each round to make sure you are on track.
- I suggest you use the Invisible Joining method to finish rounds of the Solid Square, and all rounds of the Bellflower Square, for a neat consistent finish. I have provided Instructions on how to do an Invisible join in this post.
Photo Tutorial for the Invisible Needle Join

You will need the pattern for the Solid Square this week as well as the Bellflower Square. The solid squares are included in between the flower squares in the blanket.
Some of the flowers squares are open and lacy so the solid ones give weight to the finished piece. You can make them in different colours as I did, or in a single colour if you prefer……have fun designing your own unique blanket!
Invisible Needle Join
Abbreviations (US Terms)
- Beg – beginning
- Ch – chain
- St – stitch
- Sc – single crochet
- Hdc – half double crochet
- Dc – double crochet
- Tr – treble crochet
- Sl st – slip stitch
- Yo – yarn over
Abbreviations (UK Terms)
- Beg – beginning
- Ch – chain
- St – stitch
- Dc – double crochet
- Htr – half treble crochet
- Treble – treble crochet
- Dtr – double treble crochet
- Sl st – slip stitch
- Yo – yarn over
Instructions for Bellflower Square (US and UK Crochet Terms)
Read through Special Stitches for the version you will follow.
Special Stitches (US Crochet Terms)
- Puff Stitch (PS): YO and insert hook in indicated stitch and pull up a loop to the height of a hdc, (yo and insert hook in same st and pull up a loop) 4 times in total, yo and pull through all 11 loops.
- Double crochet 2 together (dc2tog): In indicated space or st, work (yo, insert hook in space/st, yo and pull up loop, yo and pull through 2 loops on hook) twice, yo and pull through all 3 loops on hook.
- Double crochet 3 together (dc3tog): In indicated space or st, work (yo, insert hook in space/st, yo and pull up loop, yo and pull through 2 loops on hook) 3 times, yo and pull through all 4 loops on hook.
Instructions (US Crochet Terms)
Using first colour
Round 1: Ch 2, 5 sc into 2nd ch from hook, join with a sl st to 1st sc. Fasten off yarn – 6 sc Pic A
(to keep your ring neat, you will use the join where you sl st, as a st on the next row. It stops that annoying hole that appears!)
Round 2: Join next colour in any st, ch 3, dc2tog (see special stitches) (ch 3 and dc2tog count as 1st dc3tog), ch 5, * dc3tog (see special stitches) in next st, ch 5; repeat from * 4 more times. Join with a sl st to 1st ch-5 sp. Fasten off yarn – 6 dc3tog, 6 ch-5 Pic B

Round 3: Join in any ch-5 sp, ch 1, [1 sc, 1 hdc, 5 dc, 1 hdc, 1 sc] in same sp, * [1 sc, 1 hdc, 5 dc, 1 hdc, 1 sc] in next ch-5 sp; rep from * 4 more times. Join with a sl st to beg sc. Fasten off yarn – 6 petals Pics C & D

Round 4: Join in the 1st dc of any petal, ch 1, 1 sc in same st, * ch 4, skip 3 sts, 1 sc in next st (5th dc of petal), ch 4, skip 4 sts, 1 sc in next st (1st dc of next petal); rep from * around, ending with a sl st in beg sc. Do not fasten off yarn – 12 ch-4 sp Pic E
Round 5: [1 sc, ch 1, 1 PS (see special stitches), ch 2, 1 sc] in each ch-4 sp around. Join with a sl st to 1sc. Fasten off yarn – 12 petals Pic F

Round 6: Join yarn in top of any PS, ch 5 (counts as 1 dc, ch 2), 1 tr, ch 2, 1 dc in same st (corner made), * ch 3, 1 sc in next PS, ch 4, 1 sc in next PS, ch 3, ** [1 dc, ch 2, 1 tr, ch 2, 1 dc] in next PS; rep from * 2 more times, and from * to ** once more. Join with a sl st to 3rd ch of beg ch 5. Fasten off yarn. Pic G
Round 7: Join yarn in 1st dc of any corner, ch 3 (counts as 1 dc), 2 dc in next ch-2 sp, * [1 dc, ch 2, 1 dc] in next tr, 2 dc in next ch-2 sp, 1 dc in next dc, 3 dc in next ch-3 sp, 1 dc in next sc, 4 dc in next ch-4 sp, 1 dc in next sc, 3 dc in next ch-3 sp, ** 1 dc in next dc, 2 dc in next ch-2 sp; rep from * 2 more times, and from * to ** once more. Join with a sl st to beg ch 3. Fasten off yarn – 20 dc in each side Pic H

Round 8: With main colour, join in any ch-2 sp. Ch 3 (counts as 1 dc), 1 dc, ch 2, 2 dc in same sp,1dc in each st around, (2 dc, ch 2, 2 dc) in corner ch-2 sp. Join with a sl st to beg ch 3. Fasten off yarn – 24 dc in each side

You have just completed your 6th square! Now weave in all those ends, you will thank me later I promise!
Special Stitches (UK Crochet Terms)
- Puff Stitch (PS): YO and insert hook in indicated stitch and pull up a loop to the height of a hdc, (yo and insert hook in same st and pull up a loop) 4 times in total, yo and pull through all 11 loops.
- Treble crochet 2 together (tr2tog): In indicated space or st, work (yo, insert hook in space/st, yo and pull up loop, yo and pull through 2 loops on hook) twice, yo and pull through all 3 loops on hook.
- Treble crochet 3 together (tr3tog): In indicated space or st, work (yo, insert hook in space/st, yo and pull up loop, yo and pull through 2 loops on hook) 3 times, yo and pull through all 4 loops on hook.
Instructions (UK Crochet Terms)
Using first colour
Round 1: Ch 2, 5 dc into 2nd ch from hook, join with a sl st to 1st dc. Fasten off yarn – 6 dc Pic A
(to keep your ring neat, you will use the join where you sl st, as a st on the next row. It stops that annoying hole that appears!)
Round 2: Join next colour in any st, ch 3, tr2tog (see special stitches) (ch 3 and tr2tog count as 1st tr3tog), ch 5, * tr3tog (see special stitches) in next st, ch 5; repeat from * 4 more times. Join with a sl st to 1st ch-5 sp. Fasten off yarn – 6 tr3tog, 6 ch-5 Pic B
Round 3: Join in any ch-5 sp, ch 1, [1 dc, 1 htr, 5 tr, 1 htr, 1 dc] in same sp, * [1 dc, 1 htr, 5 tr, 1 htr, 1 dc] in next ch-5 sp; rep from * 4 more times. Join with a sl st to beg dc. Fasten off yarn – 6 petals Pics C & D
Round 4: Join in the 1st tr of any petal, ch 1, 1 dc in same st, * ch 4, skip 3 sts, 1 dc in next st (5th tr of petal), ch 4, skip 4 sts, 1 dc in next st (1st tr of next petal); rep from * around, ending with a sl st in beg dc. Do not fasten off yarn – 12 ch-4 sp Pic E
Round 5: [1 dc, ch 1, 1 PS (see special stitches), ch 2, 1 dc] in each ch-4 sp around. Join with a sl st to 1dc. Fasten off yarn – 12 petals Pic F
Round 6: Join yarn in top of any PS, ch 5 (counts as 1 tr, ch 2), 1 dtr, ch 2, 1 tr in same st (corner made), * ch 3, 1 dc in next PS, ch 4, 1 dc in next PS, ch 3, ** [1 tr, ch 2, 1 dtr, ch 2, 1 tr] in next PS; rep from * 2 more times, and from * to ** once more. Join with a sl st to 3rd ch of beg ch 5. Fasten off yarn. Pic G
Round 7: Join yarn in 1st tr of any corner, ch 3 (counts as 1 tr), 2 tr in next ch-2 sp, * [1 tr, ch 2, 1 tr] in next dtr, 2 tr in next ch-2 sp, 1 tr in next tr, 3 tr in next ch-3 sp, 1 tr in next dc, 4 tr in next ch-4 sp, 1 tr in next dc, 3 tr in next ch-3 sp, ** 1 tr in next tr, 2 tr in next ch-2 sp; rep from * 2 more times, and from * to ** once more. Join with a sl st to beg ch 3. Fasten off yarn – 20 tr in each side Pic H
Round 8: With main colour, join in any ch-2 sp. Ch 3 (counts as 1 tr), 1 tr, ch 2, 2 tr in same sp, 1tr in each st around, (2 tr, ch 2, 2tr) in corner ch-2 sp. Join with a sl st to beg ch 3. Fasten off yarn – 24 tr in each side
You have just completed your 6th square! Now weave in all those ends, you will thank me later I promise!
Pin the Pattern for later!

You might like to check out my other Free Patterns
Don’t forget to follow me on Instagram and be sure to tag me in your photos so I can see it too, @anniedesigncrochet or #anniedesigncrochet – I can’t wait to see what colours you use with this pattern!
The photographs and pattern contained on this page are the property of Annie Design Crochet.com.
You are welcome to use this pattern to make items to sell, and I would appreciate that you include a link to the free pattern with credit for the designer, thank you!
No unauthorized reproduction, in whole or in part, or distribution of this pattern or content is permitted.

Merci beaucoup Carmen