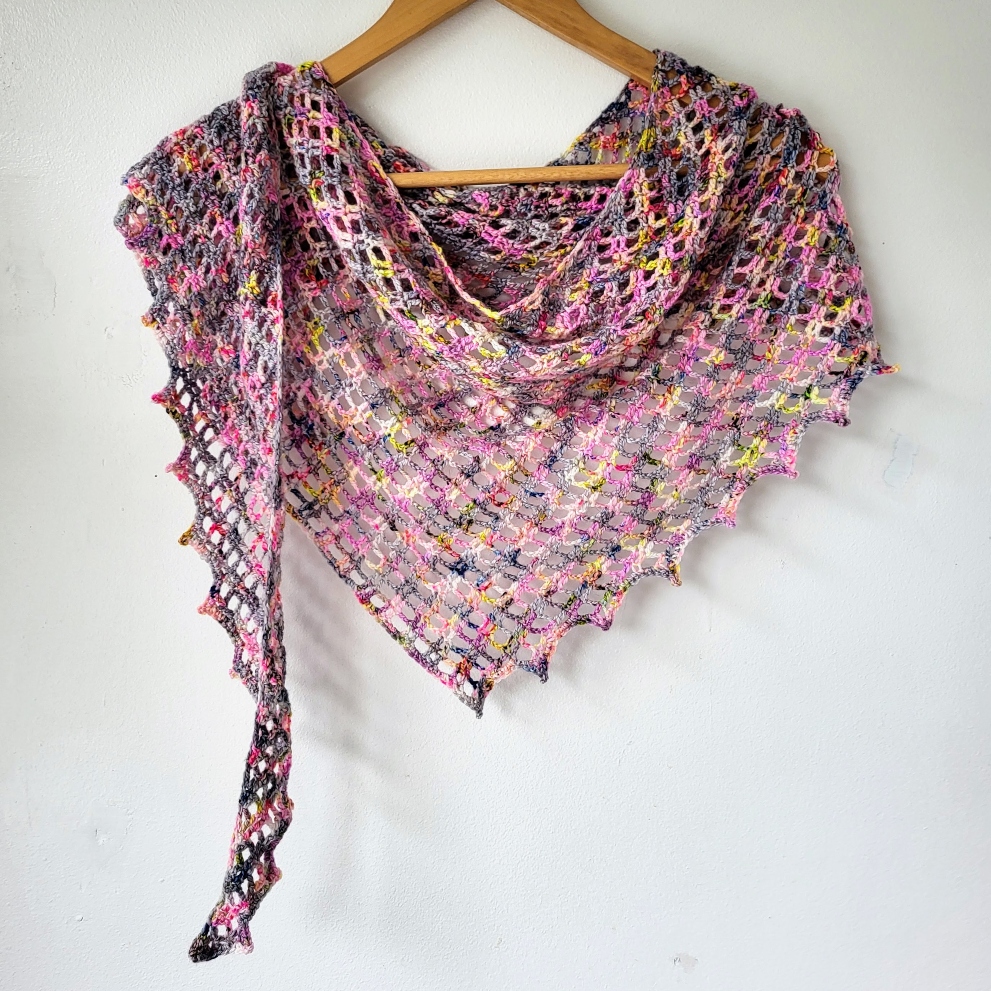
You will love this free pattern for an asymmetrical crochet shawl! The small, lightweight lace shawl is perfect for everyday wear, and it’s made with just one skein of lightweight yarn.
The pattern is easy to follow, even for beginners, and only uses basic stitches like chains and double crochets. The paid PDF version of this pattern includes a crochet chart.

How to get the Asymmetrical Shawl Pattern
- Free Crochet Pattern: Scroll down this blog post for the free written pattern for Gloaming Shawl
- Printable PDF: Ad-free PDF pattern with 7 pages including a printable crochet chart. This helps me continue to provide free patterns. Thank you for your support! – Purchase on Ravelry and on Etsy
Beginner Asymmetrical Triangle Shawl Details
This beautiful shawl is worked in an easy mesh stitch pattern that creates a delicate and airy fabric. The shawl is small enough to be worn as a scarf, or as a statement piece on your shoulders to dress up a favorite coat.
With its simple design and versatility, it is sure to be a cherished addition to your wardrobe.
And because it uses just one skein of yarn, it’s the perfect project for anyone who wants a quick and easy crochet project. Check out Riffle – a crochet neck scarf that also uses a similar light and airy stitch pattern.

How to Crochet an Asymmetrical Shawl
The asymmetrical shawl design is a fun pattern that starts at a point and gradually increases in size. You will increase on one side of the shawl while the other side gradually decreases in steps, creating ‘points’ on the edge.
This shawl shape is often called a boomerang shawl too.
The pattern is a 4 row repeat, so you can make the shawl as large as you wish or until you run out of yarn.

Yarn
I used a beautiful skein of yarn from Hedgehog Fibres, a light fingering yarn weight. The colors were a joy to crochet with! And the yarn was soft and worked up beautifully.
You could also use a fingering weight, sports weight or a dk weight yarn for this asymmetrical crochet shawl. Just make sure to match your crochet hook size to your yarn.
If you wish to use the same yarn for your border, weigh approximately 12g of yarn before you start your shawl. A contrast color would also be beautiful.

More Free Crochet Shawl Patterns
My favorite crochet projects to design are shawls in all shapes and sizes! This asymmetrical crochet triangle shawl uses a sportsweight yarn and is large and cozy. Tendril shawl revisted uses a beautiful gradient yarn.
You may enjoy this lovely triangular shawl that uses a pretty gradient yarn. If you are looking for a smaller shawl check out this one skein shawl. This collection includes most of my one skein crochet shawl designs.
You can purchase the ad-free PDF pattern with 7 pages including a printable crochet chart. This helps me continue to provide free patterns. Thank you for your support! Purchase on Ravelry and on Etsy
PIN FOR LATER

Crochet Asymmetrical Shawl Pattern
Gloaming shawl is the perfect design to use a special skein of yarn. The asymmetrical shape and simple pattern make it a quick and easy project, even for beginners. The shawl is worked in rows with a simple repeat and includes a crochet chart for easy reference. The soft, speckled yarn creates a beautiful and versatile shawl that can be worn as a scarf or wrap.
Materials
- 1 skein of Hedgehog Yarns – Oh So Fine – light fingering, 100% merino yarn, 465 yds/ 425 m, 100g – Color: Dada
- 3.5 mm crochet hook
- Yarn needle
Measurements
Shawl pictured measures 68” [173cm] x 28” [71cm] after blocking.
Abbreviations
US crochet terms
- Beg beginning
- Ch chain
- Sl st slip stitch
- St stitch
- Sc single crochet
- Dc double crochet
- Rep repeat
- Sp space
Special Stitches
Picot – ch 3, sl st back into 1st chain made
Notes
- Instructions, including stitch counts, have been provided for the first 12 rows
- Shawl starts at one end. Working in rows, increasing by 2 sts each row on one side only, and decreasing in ‘steps’ every 4 rows on the other side, until desired size is reached
- Shawl needs strong blocking to give it its shape
- Ch 3 at beginning of a row counts as 1 dc throughout
- You can use a standing crochet stitch instead of ch 3 at beginning of a row
- Gauge is not important
- Shawl pictured uses the same yarn for the border but a contrast yarn would also look beautiful
- You will finish your shawl on a row 16 of repeat row sequence
- You will need to leave approx. 12g of yarn for the border. Weigh 12g of yarn before you start your shawl
- Pattern is written in US crochet terms

Shawl Instructions
Using 3.5mm hook, make a Magic Ring
Row 1: Ch 3 (counts as 1 dc here and throughout), 2 dc in ring, turn. Pull yarn tight to
close ring – 3 dc
Row 2: Ch 3, 1 dc in next st, ch2, 1 dc in last st, turn – 3 dc, 1 x ch-2 sp
Row 3: Ch 3, 2 dc in 1st st (base of ch 3), ch 2, skip next ch-2 sp, 1 dc in next st, 1 dc in
last st, turn – 5 dc, 1 x ch-2 sp
Row 4: Ch 3, 1 dc in next st, ch 2, skip next ch-2 sp, 1 dc in each of the next 2 sts, ch 2,
1 dc in last st, turn – 5 dc, 2 x ch-2 sp
Row 5: Ch 3, 2 dc in 1st st, ch 2, skip next ch-2 sp, 1 dc in each of next 2 sts, turn
(leaving last ch-2 sp and last 2 sts unworked) – 5 dc, 1 ch-2 sp
Row 6: Ch 3, 1 dc in next st, ch 2, skip next ch-2 sp, 1 dc in each of the next 2 sts, ch 2,
1 dc in last st, turn – 5 dc, 2 x ch-2 sp
Row 7: Ch 3, 2 dc in 1st st, ch 2, skip next ch-2 sp,1 dc in each of the next 2 sts, ch 2,
skip next ch-2 sp, 1 dc in next st, 1 dc in last st, turn – 7dc, 2 x ch-2 sp
Row 8: Ch 3, 1 dc in next st, [ch 2, skip next ch-2 sp, 1 dc in each of the next 2 sts] 2
times, ch 2, 1 dc in last st, turn – 7 dc, 3 x ch-2 sp
Row 9: Ch 3, 2 dc in 1st st, ch 2, skip next ch-2 sp,1 dc in each of the next 2 sts, ch 2,
skip next ch-2 sp, 1 dc in each of next 2 sts, turn (leaving last ch-2 sp and last 2 sts
unworked) – 7 dc, 2 x ch-2 sp
Row 10: Ch 3, 1 dc in next st, [ch 2, skip next ch-2 sp, 1 dc in each of the next 2 sts] 2
times, ch 2, 1 dc in last st, turn – 7 dc, 3 x ch-2 sp
Row 11: Ch 3, 2 dc in 1st st, [ch 2, skip next ch-2 sp,1 dc in each of the next 2 sts] 2
times, ch 2, skip next ch-2 sp, 1 dc in next st, 1 dc in last st, turn – 9 dc, 3 x ch-2 sp
Row 12: Ch 3, 1 dc in next st, [ch 2, skip next ch-2 sp, 1 dc in each of the next 2 sts] 3
times, ch 2, 1 dc in last st, turn – 9 dc, 4 x ch-2 sp
Repeat rows start
Row 13: Ch 3, 2 dc in 1st st, [ch 2, skip next ch-2 sp,1 dc in each of the next 2 sts] across, turn leaving last ch-2 sp and last 2 sts unworked.
Row 14: Ch 3, 1 dc in next st, [ch 2, skip next ch-2 sp, 1 dc in each of the next 2 sts] across, ch 2, 1 dc in last st, turn.
Row 15: Ch 3, 2 dc in 1st st, [ch 2, skip next ch-2 sp,1 dc in each of the next 2 sts] across, turn.
Row 16: Ch 3, 1 dc in next st, [ch 2, skip next ch-2 sp, 1 dc in each of the next 2 sts] across, ch 2, 1 dc in last st, turn.
Rows 17 – 120: Rep Rows 13 – 16 26 times.
Work a total of 120 rows, or until your shawl is desired size, finishing on a row 16 of repeat. Remember it will stretch with blocking. Make sure to leave enough yarn to crochet a small border (approx. 12g)
Border
(Tutorial images are slightly different but the method and instructions are correct)
You will be working first along the edge of the shawl with the ‘points’, and then you will work across the final row.
Attach yarn at the beginning point of your shawl in beg ch, ch 1, work 8 sc to your first ‘point’ (make 2 sc in each row end), picot in corner of ‘point’ (ch 3, sl st into 1st ch), work 4 sc across,

* work 8 sc up to the next ‘point’, picot, work 4 sc across; repeat from * along edge, to top of shawl.

Work 1 sc in each st across top edge of shawl, work 2 sc in last st. Fasten off.
Finishing
Weave in all loose ends. Soak your shawl in lukewarm water and gently wring in a towel. Lay project out to finished size and pull gently into shape. Pin in place and leave to dry.
Take your time pinning your finished shawl and use a pin on each ‘point’ of the border…….it will make a huge difference to the finished piece!
You can purchase the ad-free PDF pattern with 7 pages including a printable crochet chart. This helps me continue to provide free patterns. Thank you for your support! Purchase on Ravelry and on Etsy
Don’t forget to follow me on Instagram and be sure to tag me in your photos so I can see it too, @anniedesigncrochet or #anniedesigncrochet – I can’t wait to see what colours you use with this pattern!
The photographs and pattern contained on this page are the property of Annie Design Crochet.com.
You are welcome to use this pattern to make items to sell, and I would appreciate that you include a link to the free pattern with credit for the designer, thank you!
No unauthorized reproduction, in whole or in part, or distribution of this pattern or content is permitted.
Wonderful pattern and easy to follow. Thank you very much!!
You are welcome!
Hi this is so beautiful, would it work in a soft mohair yarn do you think?
It would be lovely in a 4 ply (fingering weight) mohair yarn. Or you could use 1 strand of lace weight mohair yarn with 1 strand of fingering weight yarn together. You would need a larger hook. It would work up fast!
Hi
This looks really lovely and quite easy. I am making some things to sell in aid of Action for ME. Would it be ok to use your pattern please?
Kind regards
Sarah
Hi Sarah. That is fine and I hope your sales do well.
Thankyou so much 🙂