The crochet Iris stitch is a beautiful and easy stitch pattern that looks intricate but is surprisingly simple to make. This stitch uses a repeating pattern that quickly becomes easy to memorize, making it a relaxing project for beginners and experienced crocheters alike.
In this tutorial, I’ll show you how to crochet the Iris stitch step by step. You can follow the written instructions below and watch the video tutorial to see exactly how the stitch is made.
What is the Crochet Iris Stitch?
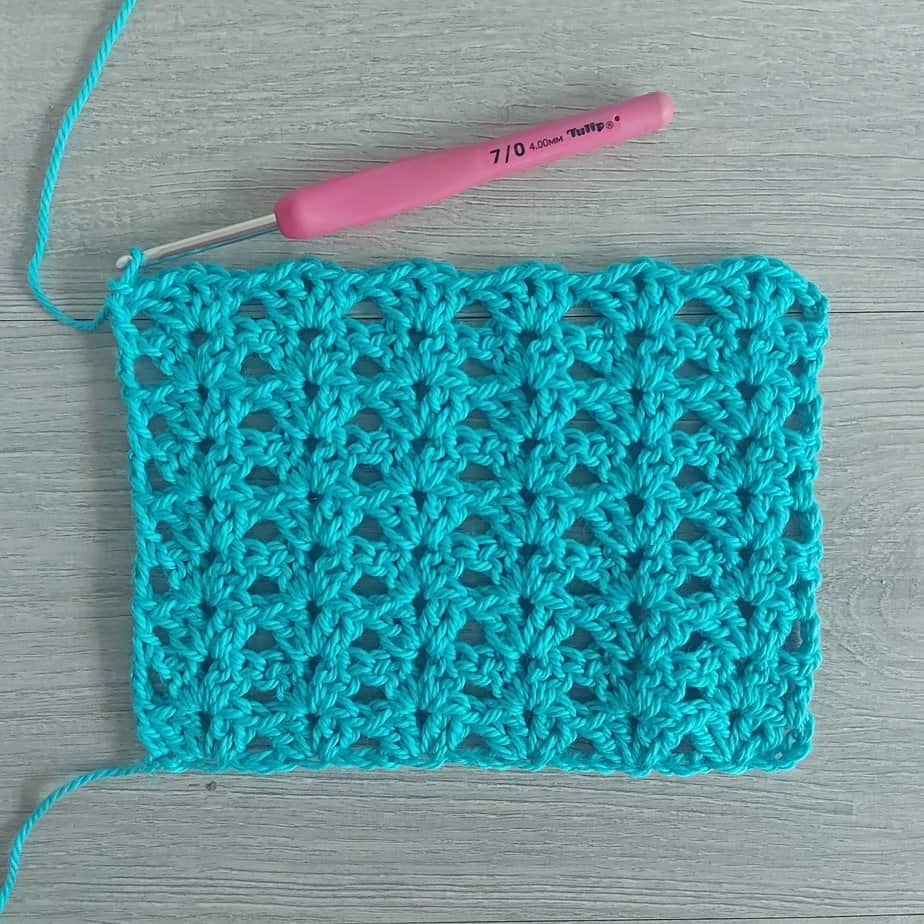
The Iris stitch is a light and textured crochet stitch made using simple stitches. It combines double crochet stitches and chain spaces to create small shell shapes that repeat across each row.
One of the reasons this stitch is so enjoyable to crochet is that most of the stitches are worked into chain spaces rather than individual stitches. This means you don’t have to spend time counting stitches or searching for where to insert your hook.
Once you complete the setup row, the pattern becomes a simple one-row repeat, which makes it very easy to remember.

Yarn for the Iris Stitch
When practising the Iris stitch with this tutorial, I recommend using a worsted weight yarn. The slightly thicker yarn makes it easier to see the stitch pattern clearly as you learn.
Once you are comfortable with the stitch, you can try using lighter weight yarns. The Iris stitch works especially well with DK weight or fingering weight yarn, creating a lovely light fabric with beautiful drape.
For the sample shown here I used King Cole Cottonsoft DK yarn with a 4.5 mm crochet hook.
Crochet Projects to Make with the Iris Stitch
The elegant Iris stitch makes lovely scarves for Spring or Summer. It is very suitable for light-weight yarns as it creates an excellent drape. The small shells in the Iris stitch create a lovely texture and are perfect for crochet scarves. Check out my pattern using the Iris stitch for a Shell Stitch Scarf
The Iris stitch is also a great option for baby blankets. The repeating pattern works up quickly and creates a soft textured fabric that looks lovely in both solid colours and stripes.
You can follow the instructions in the free crochet pattern below. You can also check out the video tutorial or you can watch the video on my YouTube Channel

How to Make an Iris Stitch Crochet Blanket
The simple repeat of the Iris stitch makes it an excellent choice for crochet blankets.
- To begin, make a foundation chain the width you would like your blanket to be, using a multiple of 4 stitches plus 3 extra chains.
- Work the first row into the foundation chain. For all following rows, the stitches are worked into the chain spaces created in the previous row.
- Continue repeating the Iris stitch pattern until your blanket reaches the desired length.
You can crochet the blanket in a single colour for a classic look, or work alternating colour stripes to create a more modern design.
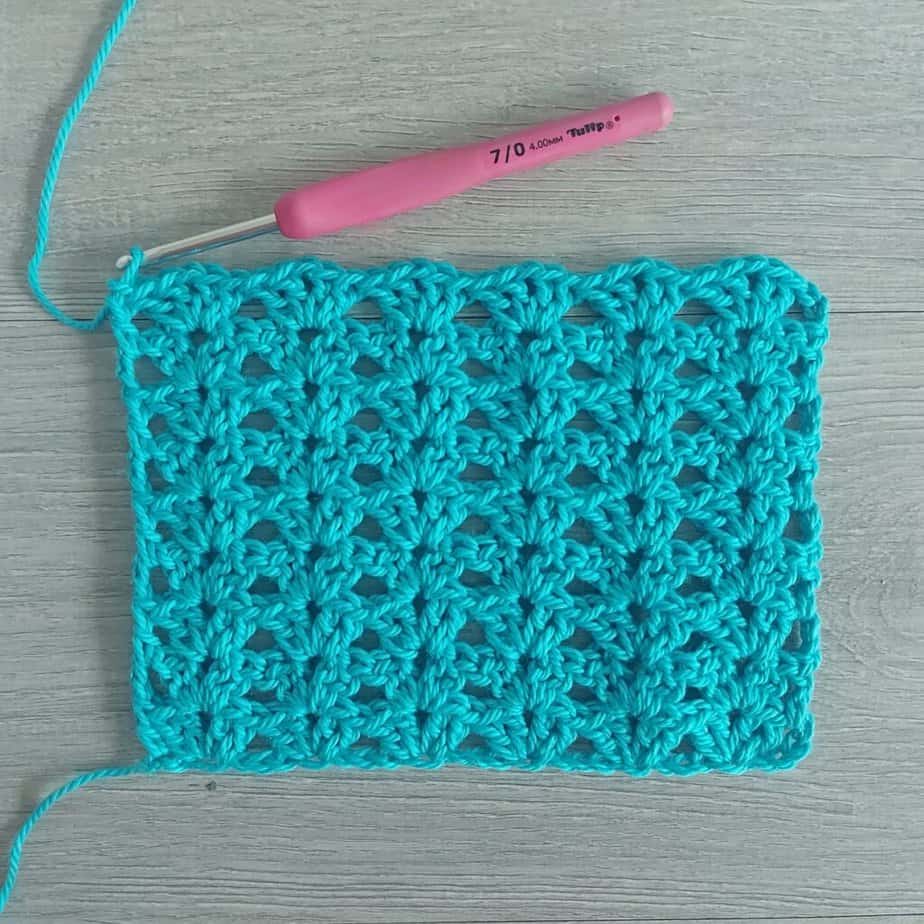
Crochet Iris Stitch Tutorial
Materials
- Worsted weight or Aran weight yarn
- 5 or 5.5 mm crochet hook
Abbreviations
- ch – chain
- st – stitch
- sc – single crochet
- dc – double crochet
- sp – space
- beg – beginning
Notes
- For the purpose of the tutorial you will make a small swatch
- Pattern is worked with a starting chain in multiples of 4 + 3
- The tutorial is in US crochet terms
- Ch 3 at beginning of a row counts as 1 dc
Crochet Iris Stitch Video
You can watch the video for Iris Stitch on my YouTube Channel
Instructions
Chain 27 or a multiple of 4 + 3 extra
Row 1: [2 dc, ch 1, 2 dc] in the 5th ch from your hook, *skip 3 ch, work [2 dc, ch 1, 2 dc] in next ch; repeat from * across until 2 chains remain, skip 1 ch, 1 dc in last ch, turn.
Row 2: Ch 3, skip 2 dc * [2 dc, ch 1, 2 dc] in next ch-1 sp, skip next 4 dc; repeat from * across, finishing the row by working 1 dc in beg chain.
Row 3: Repeat row 2 working last dc in top of beg ch 3 (or if you prefer, work last dc under the ch 3)
Repeat Row 3 to desired length for pattern
You may like to check out more of my stitch tutorials
Pin for Later!

Find more Free patterns here
If you make this pattern, don’t forget to follow me on Instagram and be sure to tag me in your photos so I can see it too, @anniedesigncrochet or #anniedesigncrochet – I can’t wait to see what colours you use with this pattern!
The photographs and pattern contained on this page are the property of Annie Design Crochet.com.
You are welcome to use this pattern to make items to sell, and I would appreciate that you include a link to the free pattern with credit for the designer, thank you!
No unauthorized reproduction, in whole or in part, or distribution of this pattern or content is permitted.
What a lovely stitch and so easy to crochet. Your suggestion for a scarf or blanket — either would be perfect.
Thank you for another beautiful stitch!
Best regards,
Sandy
Thanks so much! I have a scarf coming soon using this pattern…I love it!
Bonjour,
Bravo, c’est très aérien et le coloris est beau !
Thank you for the detailed tutorial on the Iris Stitch! The video was super helpful in seeing the stitches in action. I can’t wait to try it out on my next project!
Loved this tutorial! The Iris stitch is beautiful and I can’t wait to try it out in my next project. The video makes it so easy to follow along. Thank you for sharing such clear instructions!
Thank you for this clear tutorial on the Iris Stitch! The video guidance made it so much easier to follow along. I can’t wait to incorporate this stitch into my next project!