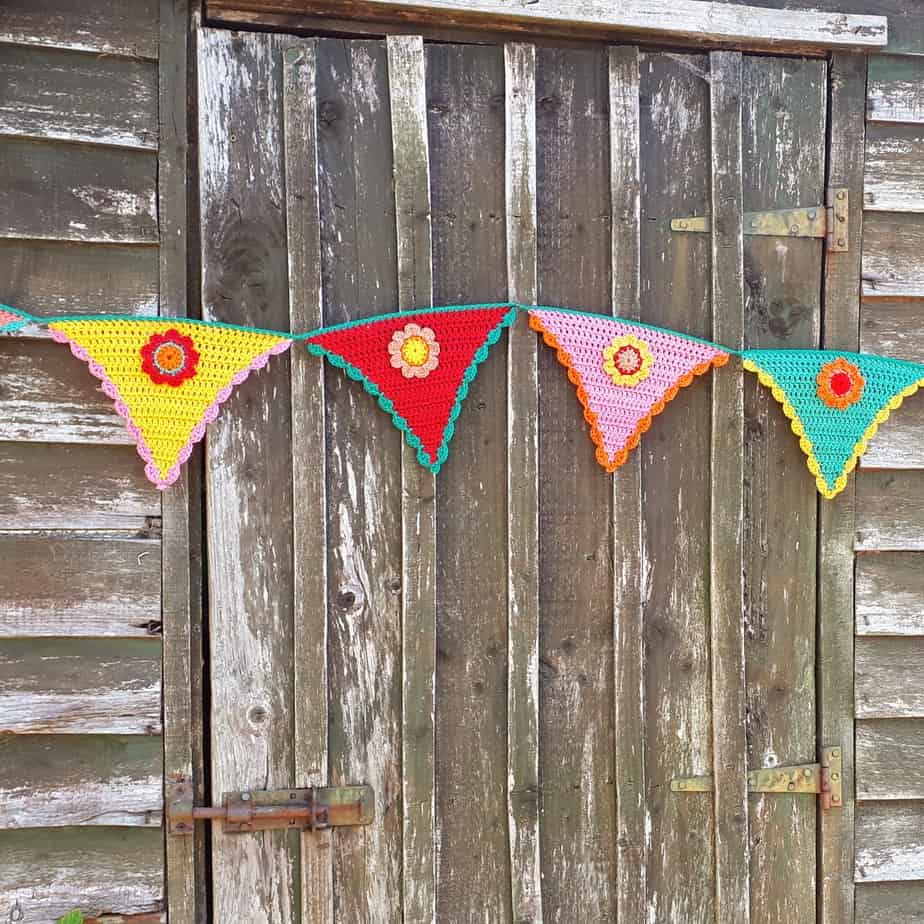
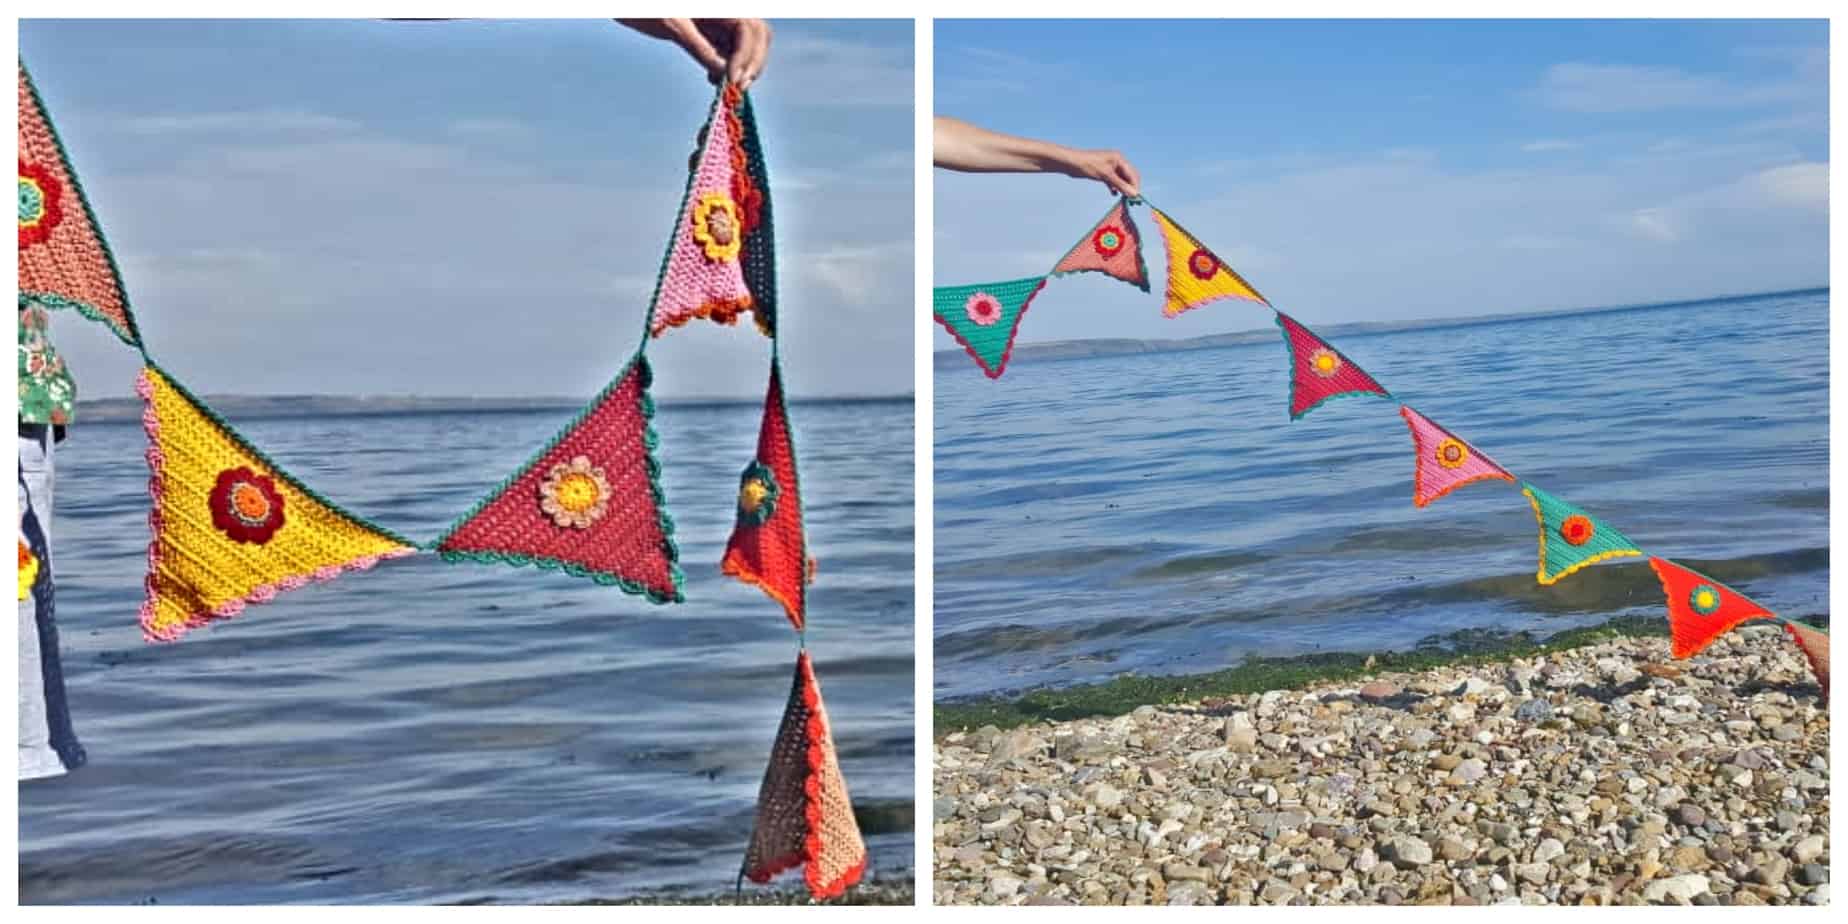
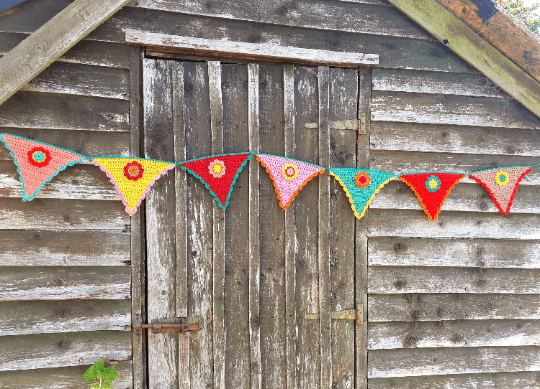
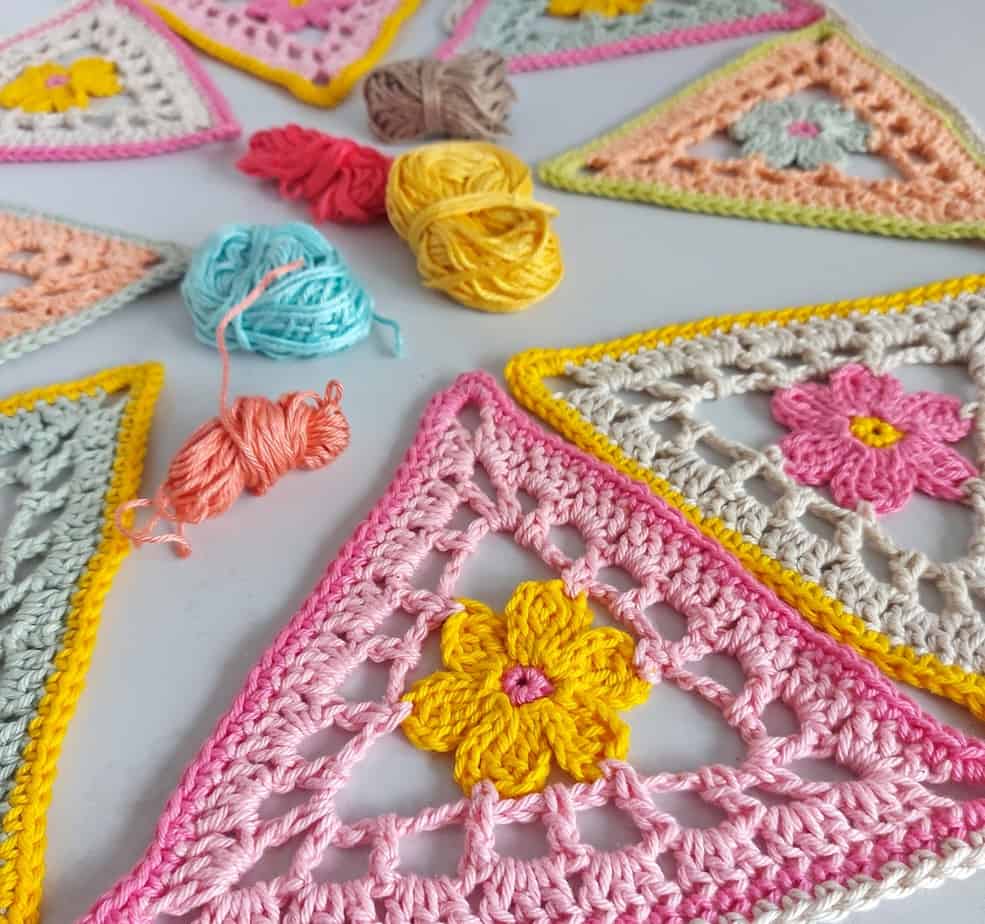
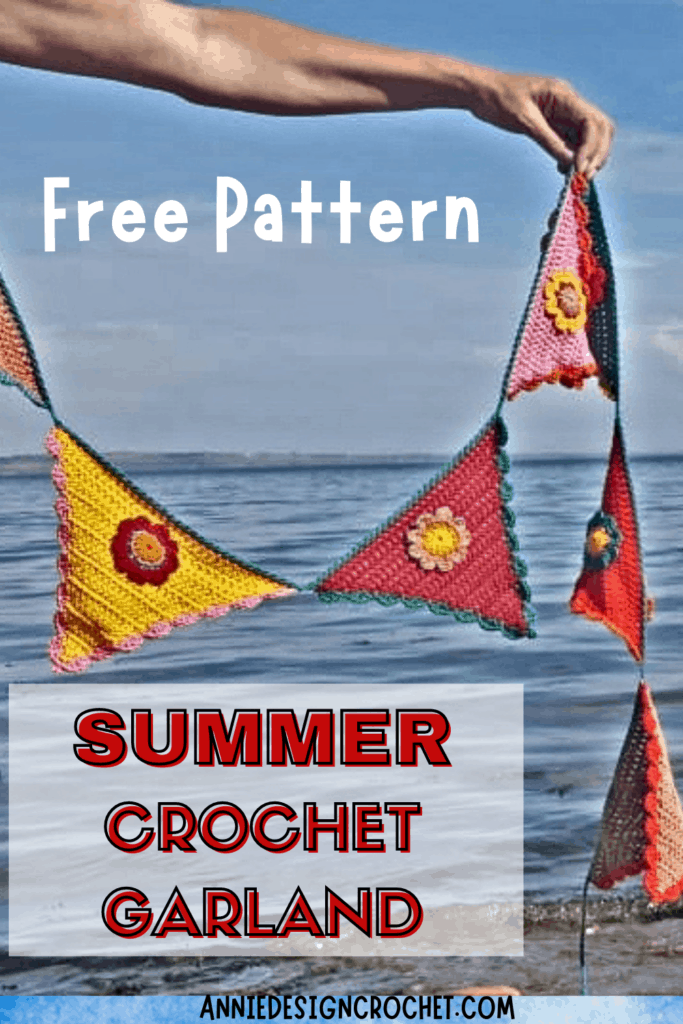
Summer is a time for festivals and outdoor fun, and making happy memories! This Crochet Festival Garland Pattern is perfect for your garden parties, to add a funky colourful Festival vibe to any occasion.
A colourful whimsical crochet pattern with step by step instructions for beginners. This bright and cheery garland is fun to make and will brighten up your home or outdoor space for years!
Plus the latest updates from Annie Design Crochet!
The pattern includes step by step instructions for the crochet triangles and the happy flowers that embellish each one.
Grab a Printable PDF adfree pattern with 5 pages including all details and pictures – Purchase on Etsy and Ravelry
The yarn used in the pattern is a DK weight cotton yarn but you could use a heavier weight yarn if you wish and matching hook. I suggest using a cotton yarn if you can, as it holds its shape well and can be washed easily.
I spruce up my crochet garlands every year by handwashing them gently and pinning out to dry. You can always bring them back to shape any time by pinning each triangle to your ironing board and giving each one a steam with a hot iron.
I hope it will inspire you to be creative with colours, and to make loads of garlands to brighten up your home and garden!
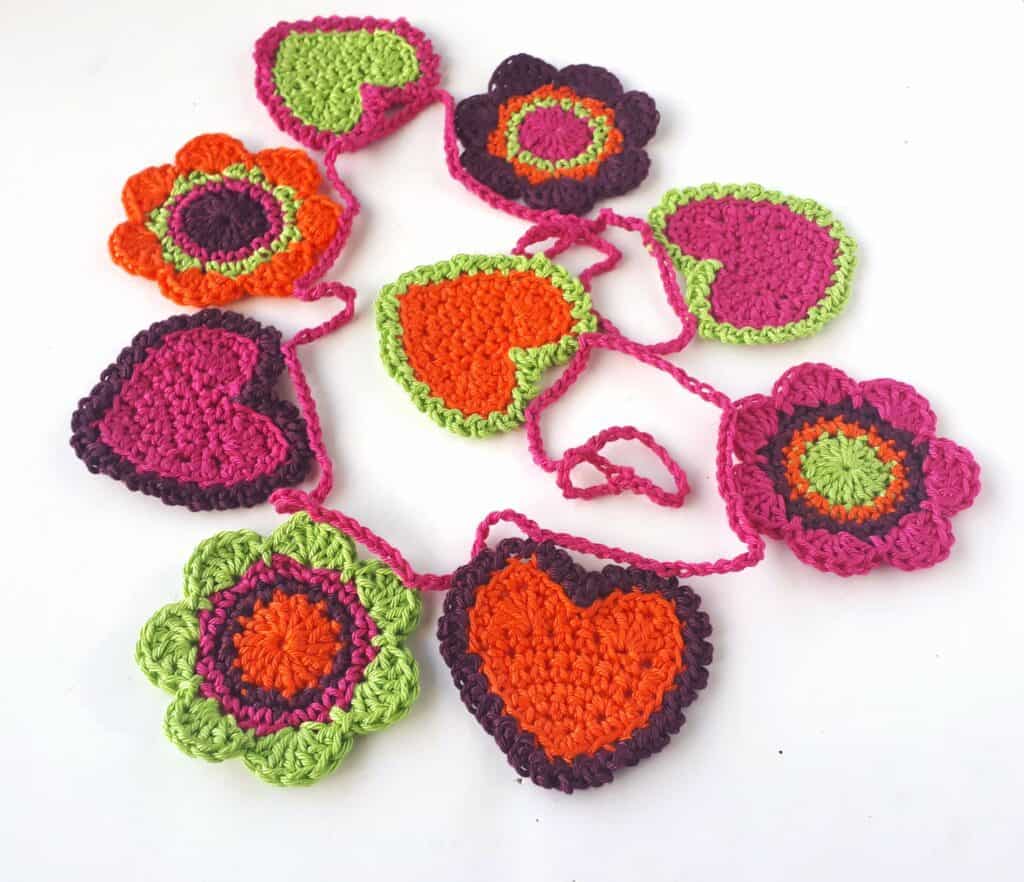
This flower crochet garland would also make a lovely addition to your collection!
How to get the Pattern for Crochet Festival Garland
- Free Pattern: Scroll down this blog post for the Instructions in US Crochet Terms
- Printable PDF: Adfree printable pattern with 5 pages including all details and pictures – Purchase on Etsy and Ravelry
You might like to check out some more Crochet Garland Patterns that are Free on my blog! Click on the picture to go to the blog post
Crochet Flower Bunting
Crochet Flowers and Hearts Garland
Materials
Paintbox Yarns Cotton DK : 100% cotton: 50gr: DK: 125m (137yds)
- 1 ball each in Soft Fudge 410, Rose Red 414, Red Wine 416, Slate Green 422, Evergreen 431, Bubblegum Pink 451, Buttercup Yellow 423, Blood Orange 420, Vintage Pink 456
- 3.50mm Crochet Hook
- yarn needle
Measurements
Length of garland is approx. 98” (250cm). Each triangle is 8.5” (22cm) in width. Add more triangles to make a longer garland if desired
Abbreviations
US Crochet terms
sc – single crochet
dc – double crochet
ch – chain
sl st – slip stitch
st – stitch
rep – repeat
beg – beginning
t-ch – turning chain
UK Crochet Terms
dc – double crochet
tr – treble crochet
ch – chain
sl st – slip stitch
st – stitch
rep – repeat
beg – beginning
t-ch – turning chain
Instructions for Crochet Festival Garland Pattern
Triangle (make 9)
Row 1: Ch4 (counts as magic ring and ch3), 2dc in first ch, turn – 3 dc
Row 2: Ch3 (counts as 1dc here and throughout), 1dc in 1st st, 1dc in next st, 2dc in last st (t-ch) – 5 dc
Row 3: Ch3, 1dc in 1st st, 1dc in next 3 sts, 2dc in last st (t-ch) – 7 dc
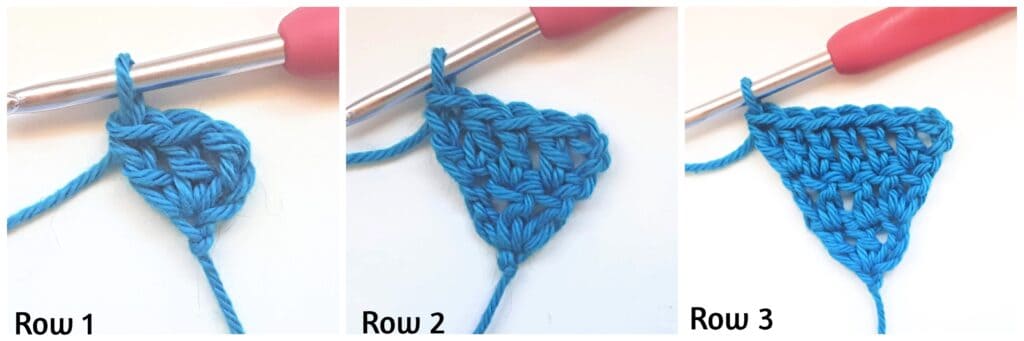
Row 4: Ch3, 1dc in 1st st, 1dc in each st across, 2dc in last st (t-ch) – 9 dc
Row 5: Ch3, 1dc in 1st st, 1dc in each st across, 2dc in last st (t-ch) – 11 dc
Row 6: Ch3, 1dc in 1st st, 1dc in each st across, 2dc in last st (t-ch) – 13 dc
Row 7: Ch3, 1dc in 1st st, 1dc in each st across, 2dc in last st (t-ch) – 15 dc
Row 8: Ch3, 1dc in 1st st, 1dc in each st across, 2dc in last st (t-ch) – 17 dc
Row 9: Ch3, 1dc in 1st st, 1dc in each st across, 2dc in last st (t-ch) – 19 dc
Row 10: Ch3, 1dc in 1st st, 1dc in each st across, 2dc in last st (t-ch) – 21 dc
Row 11: Ch3, 1dc in 1st st, 1dc in each st across, 2dc in last st (t-ch) – 23 dc
Row 12: Ch3, 1dc in 1st st, 1dc in each st across, 2dc in last st (t-ch) – 25 dc
Row 13: Ch3, 1dc in 1st st, 1dc in each st across, 2dc in last st (t-ch) – 27 dc
Row 14: Ch3, 1dc in 1st st, 1dc in each st across, 2dc in last st (t-ch) – 29 dc
Row 15: Ch3, 1dc in 1st st, 1dc in each st across, 2dc in last st (t-ch) – 31 dc
Row 16: Ch3, 1dc in 1st st, 1dc in each st across, 2dc in last st (t-ch), fasten off yarn – 33 dc
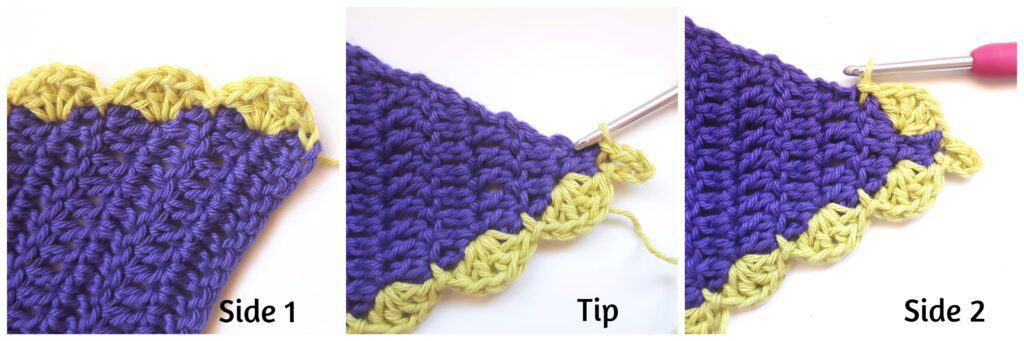
Triangle Border
You will be working into the space at the end of each row (see pics below)
Row 1: Using a contrast colour, join with a sl st in top left corner, where you finished off your triangle. * (2dc, ch1, 2dc) into next row end, sl st into next row end; rep from * along the side of triangle, making last sl st into tip of triangle, (ch5, sl st) into the same st (see pic below)
You will now work up the other side of triangle * (2dc, ch1, 2dc) into next row end, sl st into next row end; rep from * making final sl st into top right hand corner. Fasten off
Repeat border pattern for each triangle until you have 9 in total. Weave in all threads. Now make some colourful flowers to decorate your garland!
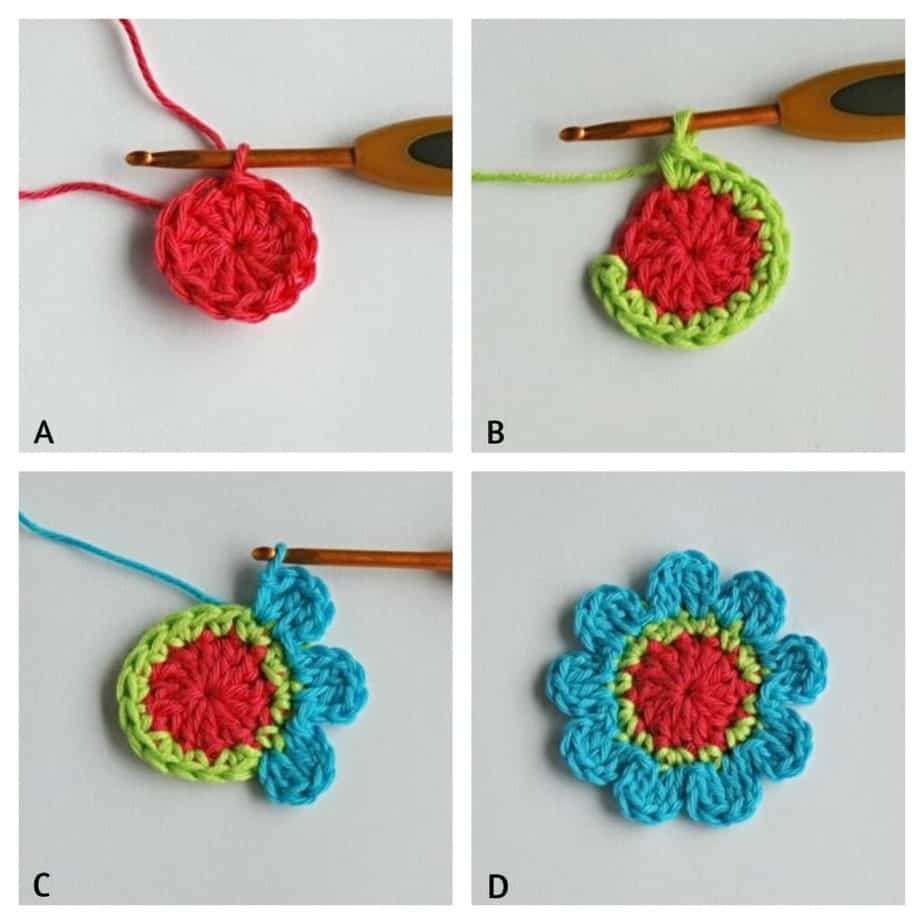
Flower Instructions (make 9)
Each flower motif uses 3 colours (yarn A, B and C)
Using yarn A, ch 4.
Round 1 : Make 11dc into 4th ch from hook. (This makes your circle) Join with a sl st to top of beg ch4, fasten off yarn – 12 dc (see picture A below)
Round 2 : Using yarn B, join in any st and ch1, 1sc in same st, 2sc in next st, * 1sc in next st, 2sc in next st; repeat from * around, join with a sl st to first sc made, fasten off yarn. – 18 sc (see picture B below)
Round 3 : Using yarn C, join in any st, ch2, 1dc in same st, 1dc in next st, ch2, sl st in same st, (petal made) * sl st into next st, ch2, 1dc in same st, 1dc in next st, ch2, sl st in same st; repeat from * around, join with a sl st into base of beg ch2. Fasten off yarn and weave in all threads. (9 petals) (see pictures C & D below)
Finishing
Sew a flower onto the centre of each triangle.
Join the triangles as follows: Using any colour yarn, ch 20, sl st into the 1st chain to form a hanging loop, and ch 20. Holding the 1st triangle with the right side facing, make 1sc in the first st on the top, and in each st across – 33 sc
Taking the next triangle, * ch 1, 1sc in the first st, and in each st across; repeat from * until all the triangles are attached. Ch 40, sl st into the 20th ch made, to form a hanging loop. Fasten off and weave in all threads. Hang up and admire!
If you make this pattern, don’t forget to follow me on Instagram and be sure to tag me in your photos so I can see it too, @anniedesigncrochet or #anniedesigncrochet – I can’t wait to see what colours you use with this pattern!
The photographs and pattern contained on this page are the property of Annie Design Crochet.com.
You are welcome to use this pattern to make items to sell, and I would appreciate that you include a link to the free pattern with credit for the designer, thank you!
No unauthorized reproduction, in whole or in part, or distribution of this pattern or content is permitted.